# STEP 2: Microphone Set Up

1. Open the gray corner cabinet

   <figure><img src="https://1313564241-files.gitbook.io/~/files/v0/b/gitbook-x-prod.appspot.com/o/spaces%2Fs3fEUGujmVHeZsdShSEN%2Fuploads%2Fh8NXftjx1ey16eZ0caDg%2Fimage.png?alt=media&#x26;token=eece8e29-5b14-4031-9a3c-225740df5df2" alt=""><figcaption></figcaption></figure>
2. Take out **both** **AKG Cases**

   <figure><img src="https://1313564241-files.gitbook.io/~/files/v0/b/gitbook-x-prod.appspot.com/o/spaces%2Fs3fEUGujmVHeZsdShSEN%2Fuploads%2FQlg4xCmJPNohpipf5vNB%2Fimage.png?alt=media&#x26;token=97cf5857-5eb7-4fbb-a2be-26b437ddf092" alt=""><figcaption></figcaption></figure>
3. Inside each case you will find a **C414 Microphone**, **Shock-mount**, and **Foam Shield**.

   <figure><img src="https://1313564241-files.gitbook.io/~/files/v0/b/gitbook-x-prod.appspot.com/o/spaces%2Fs3fEUGujmVHeZsdShSEN%2Fuploads%2Fqkx2BD1SCElUouoPi7vY%2Fimage.png?alt=media&#x26;token=c6dda581-9796-4602-8087-0e948d09fa02" alt=""><figcaption></figcaption></figure>
4. Grab 2 **Mic Stands** from the **Tracking Room**

   <figure><img src="https://1313564241-files.gitbook.io/~/files/v0/b/gitbook-x-prod.appspot.com/o/spaces%2Fs3fEUGujmVHeZsdShSEN%2Fuploads%2F4tIhpNyug2t7XclYGXSl%2Fimage.png?alt=media&#x26;token=9f73d751-1cb2-4f8f-8030-f96c6c085026" alt=""><figcaption><p><mark style="color:green;"><strong>
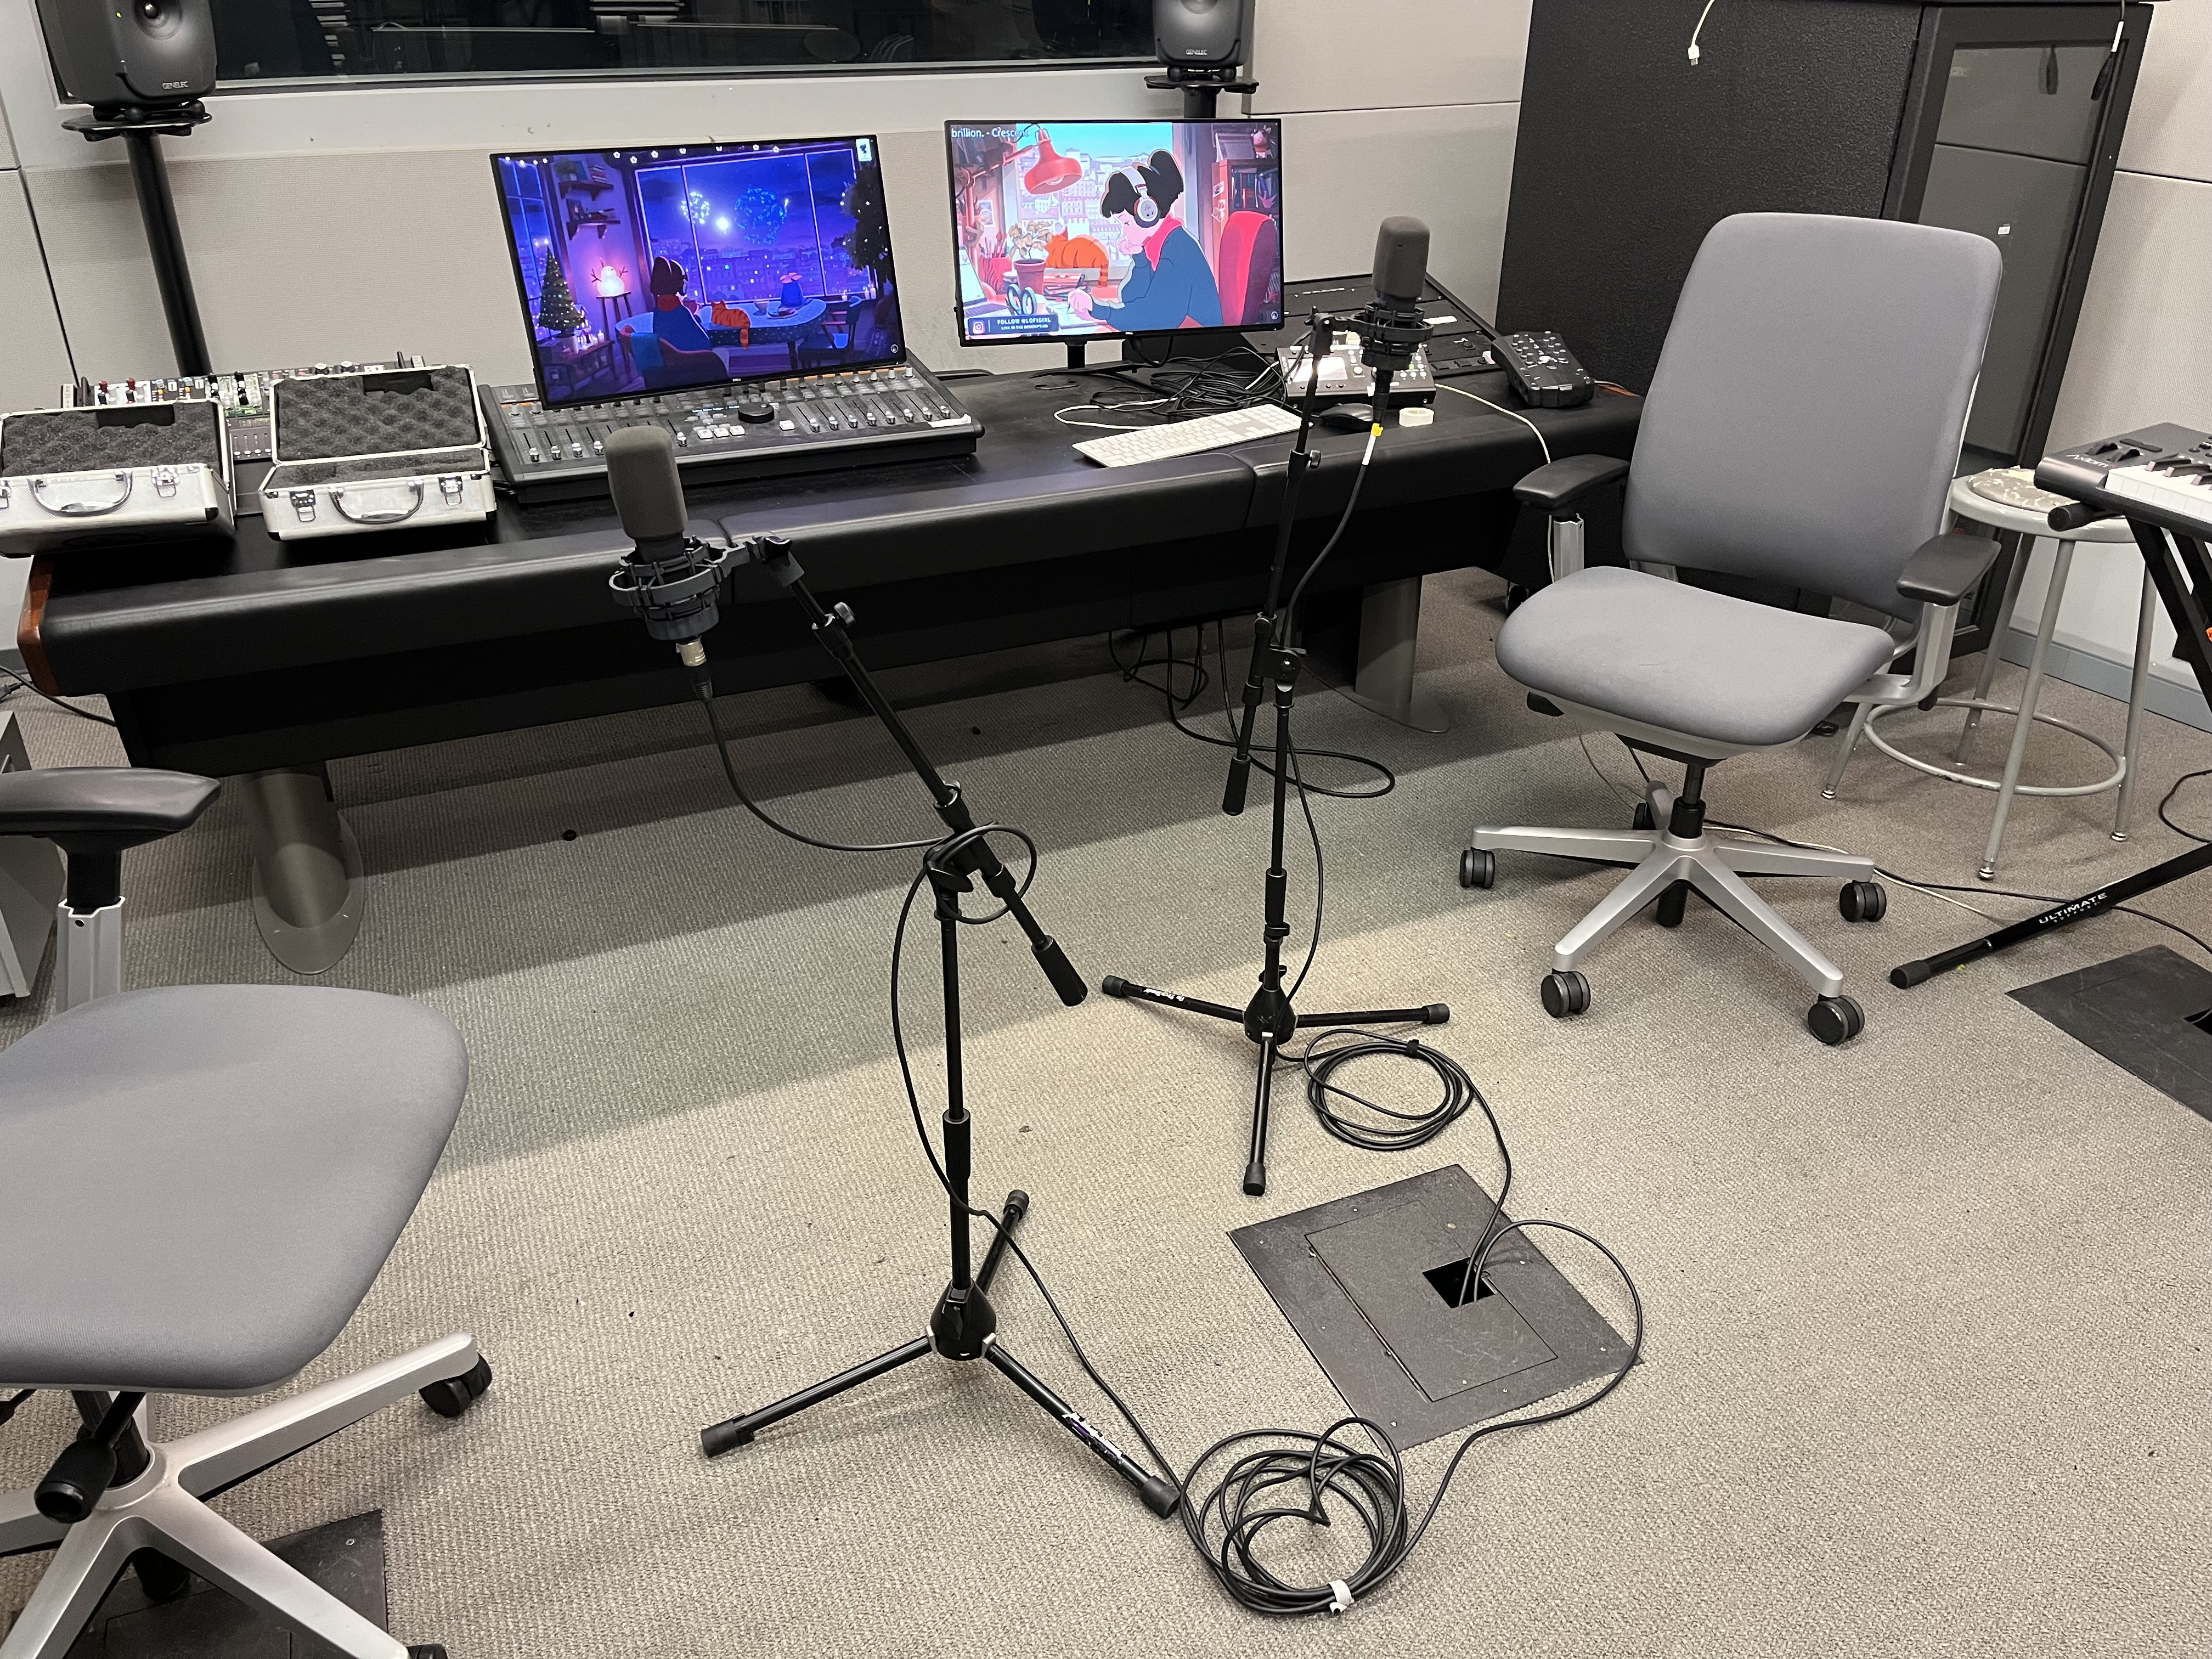
Any are fine, but I suggest the lighter tripod bases since they're easier to move around.</strong></mark></p></figcaption></figure>
5. Set up the **Mic Stands** for your ideal recording positioning using the knobs to adjust height and length

   <figure><img src="https://1313564241-files.gitbook.io/~/files/v0/b/gitbook-x-prod.appspot.com/o/spaces%2Fs3fEUGujmVHeZsdShSEN%2Fuploads%2FsJjgCIdu4KSTa2abTqsP%2Fimage.png?alt=media&#x26;token=b2b6d83e-2a3a-4800-a534-2590dd4c5b5a" alt=""><figcaption><p><mark style="color:green;">
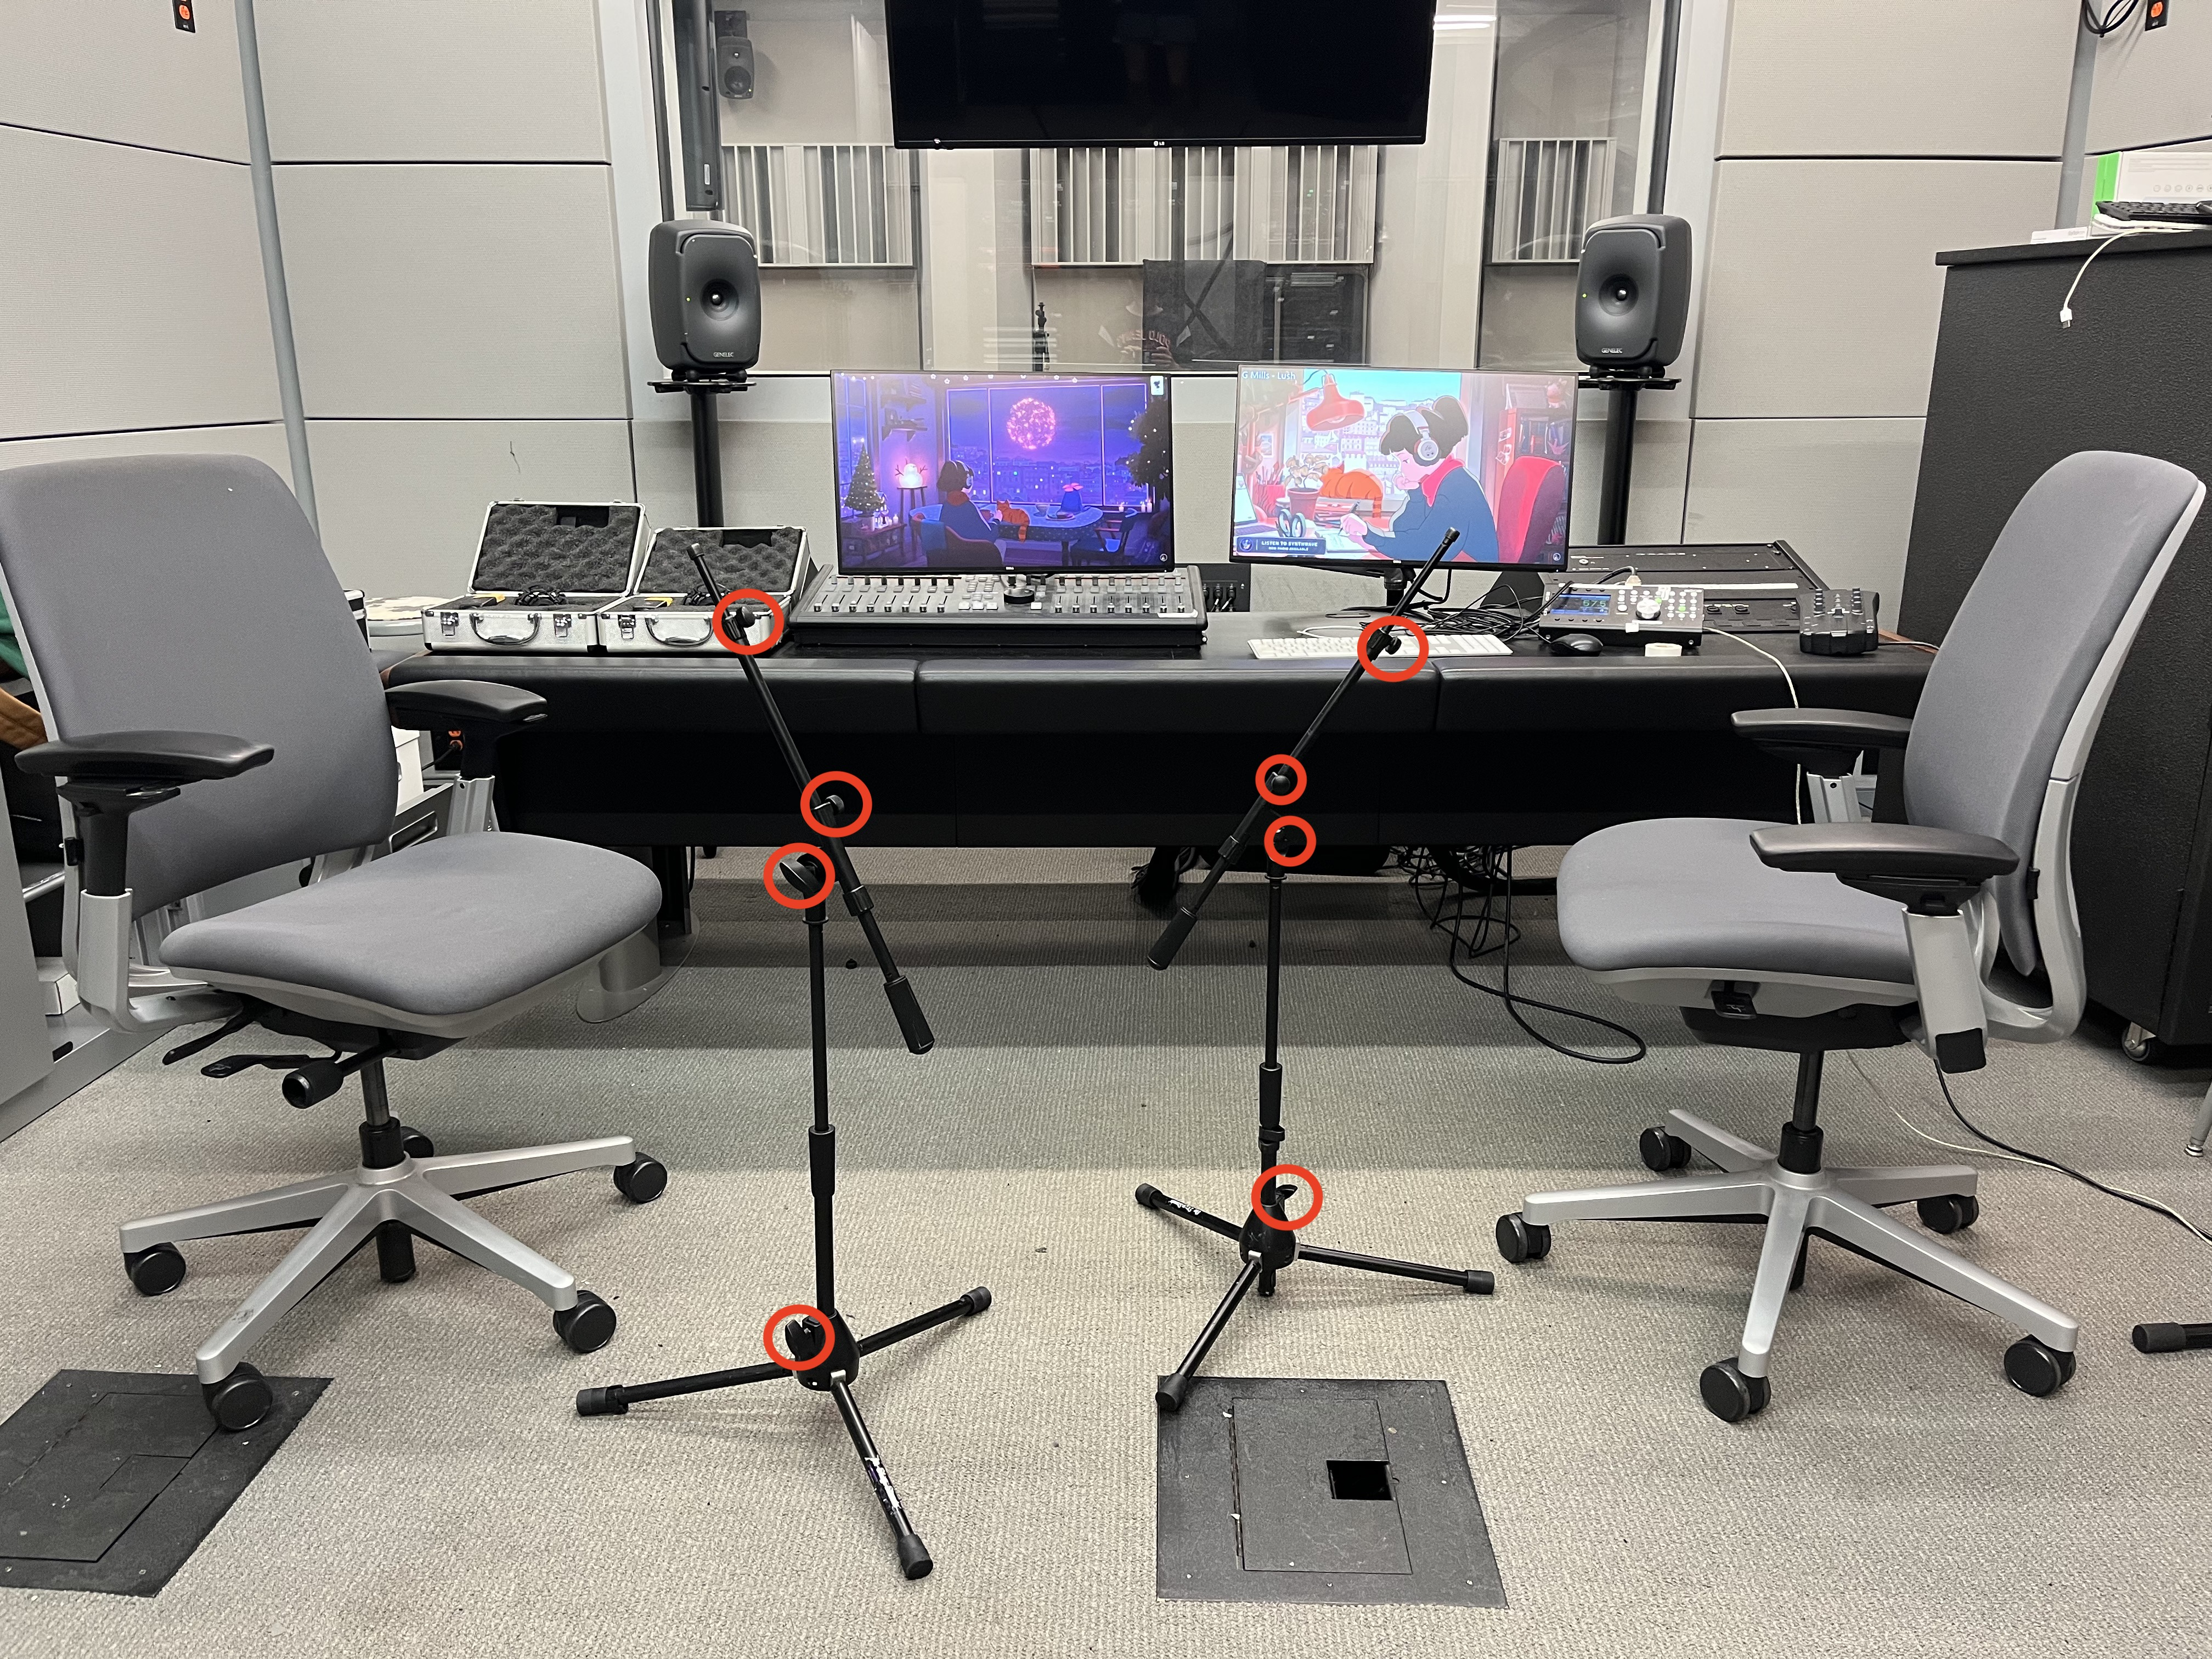
KEY TIP: Don't face your other podcaster directly in order to avoid Mic-Bleed. Try to sit with your mics facing diagonally from each other.</mark></p></figcaption></figure>
6. Attach a **Shock Mount** to the top of the **Mic Stand**

   <figure><img src="https://1313564241-files.gitbook.io/~/files/v0/b/gitbook-x-prod.appspot.com/o/spaces%2Fs3fEUGujmVHeZsdShSEN%2Fuploads%2F9XVwCkj7I4soQMq9pY5p%2Fimage.png?alt=media&#x26;token=9d203802-63f4-44ae-abe1-859befad8247" alt=""><figcaption><p><mark style="color:green;">
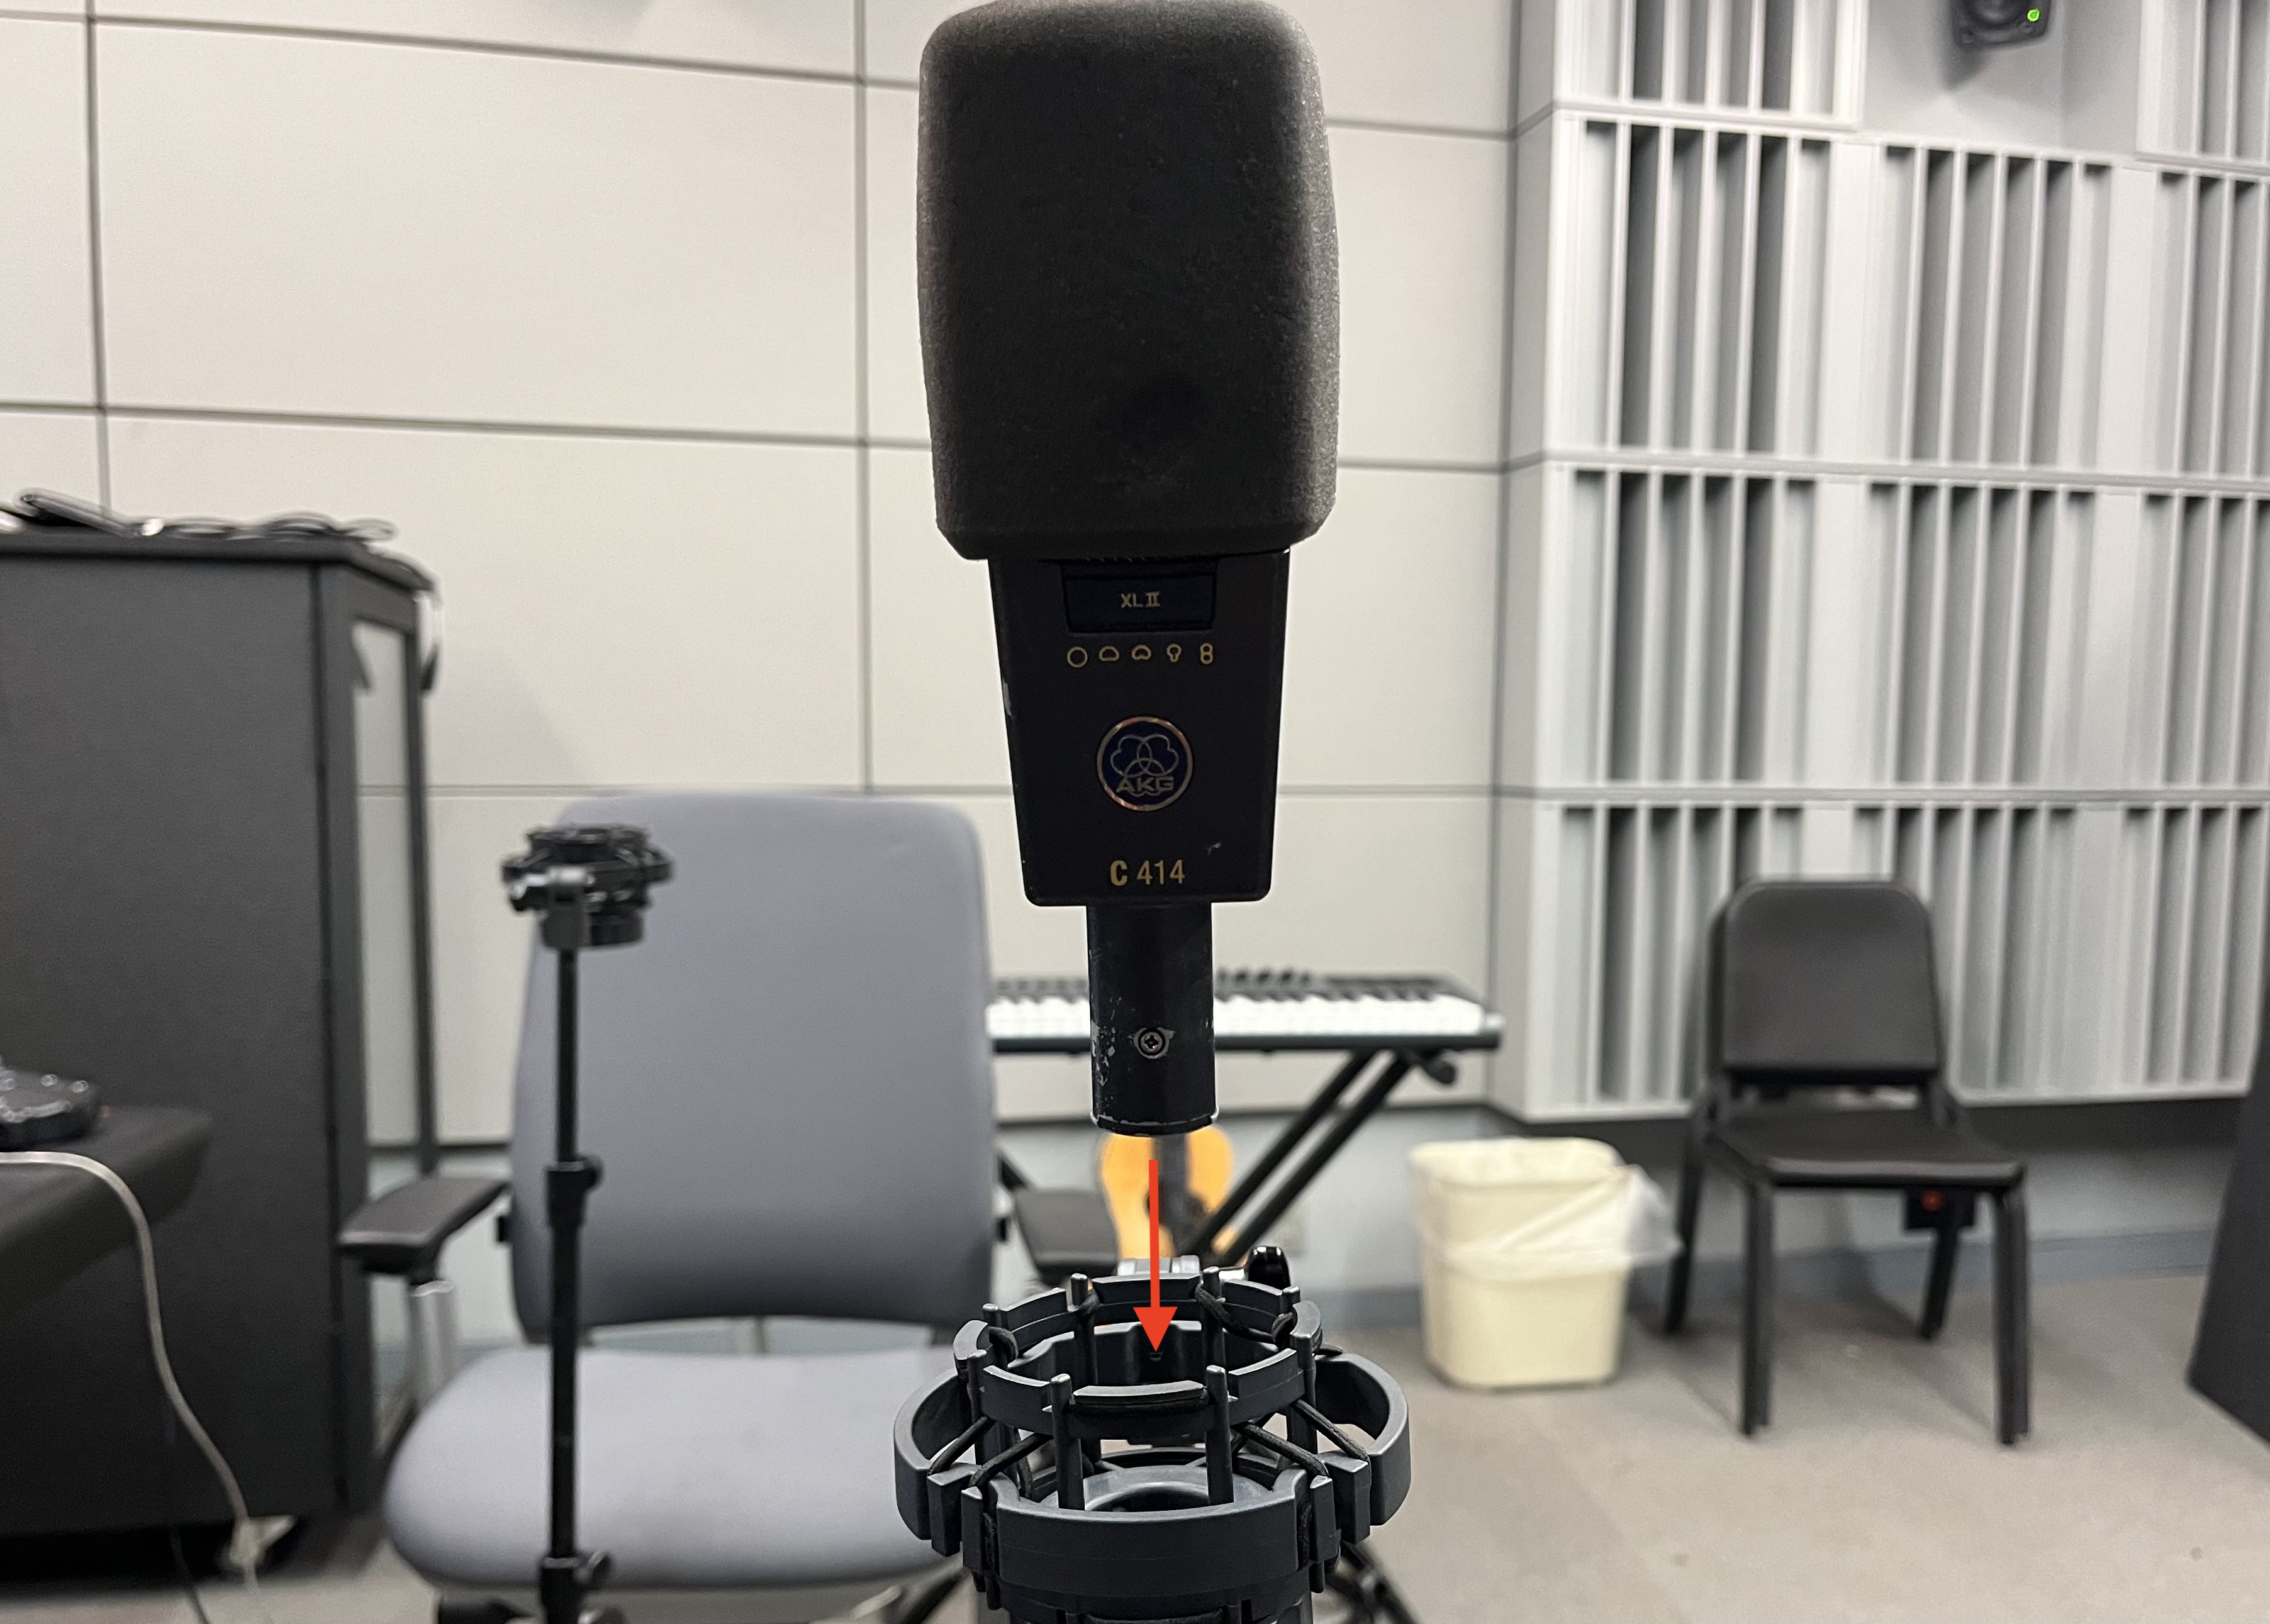
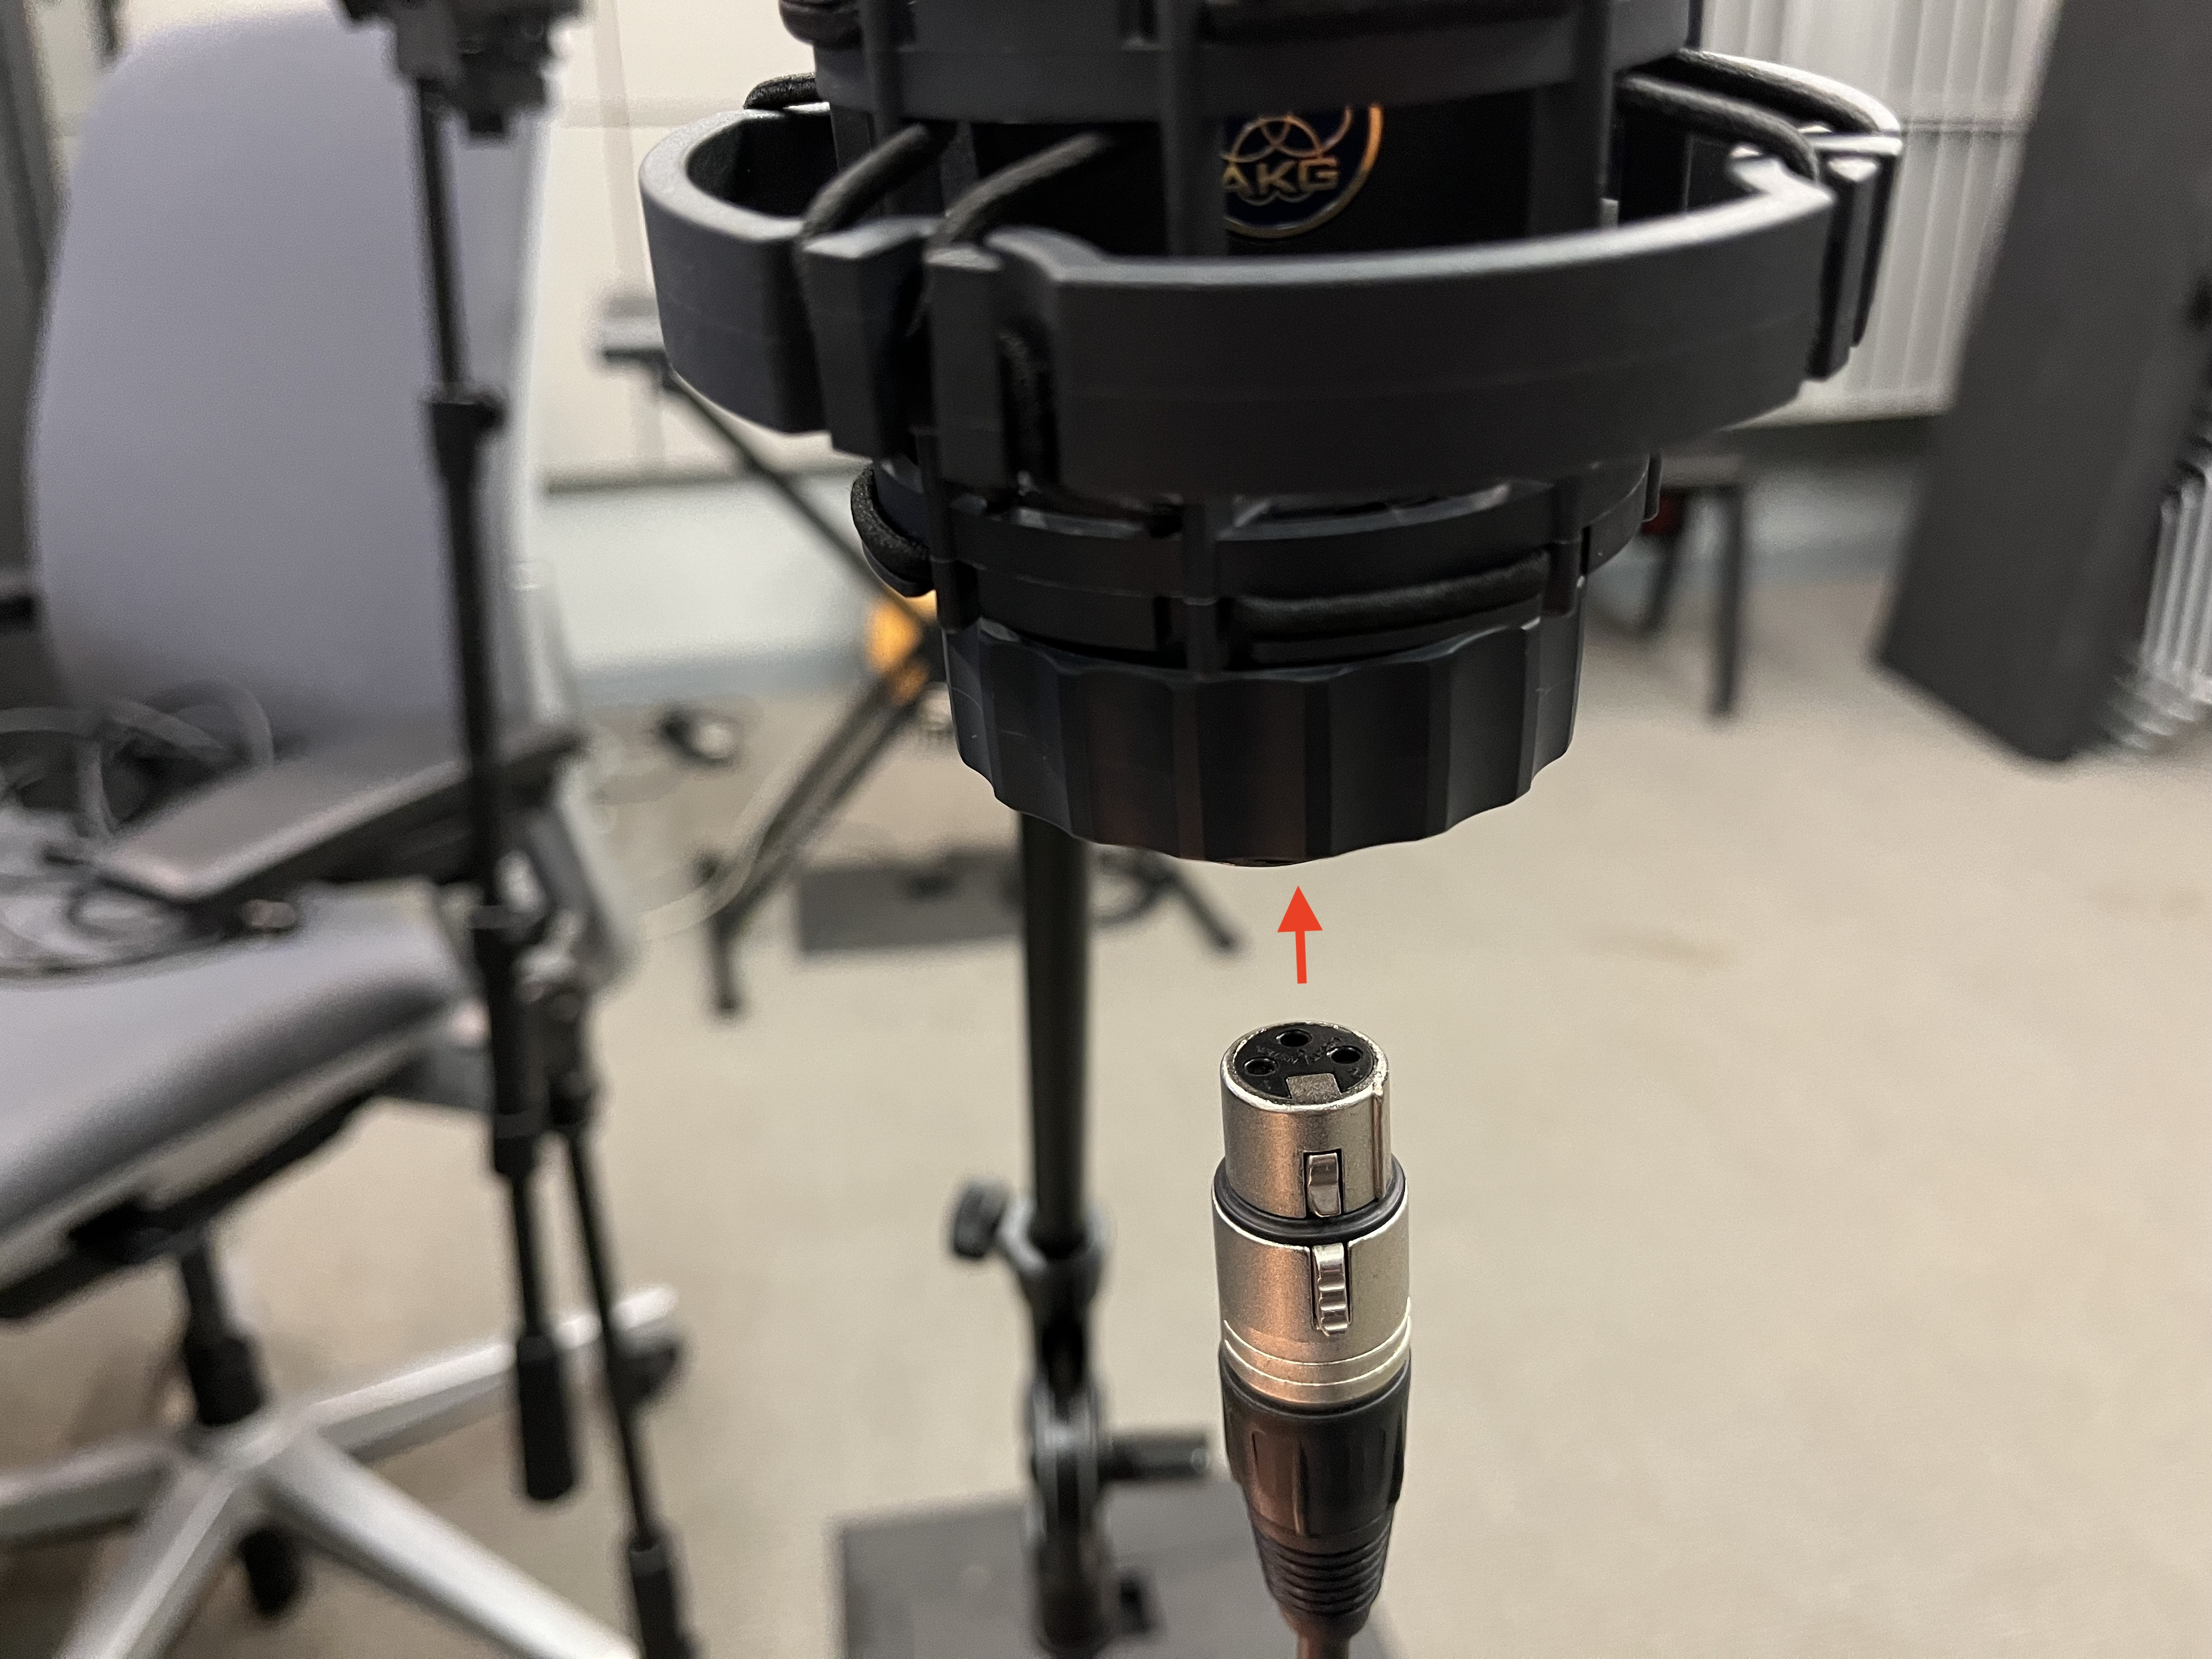
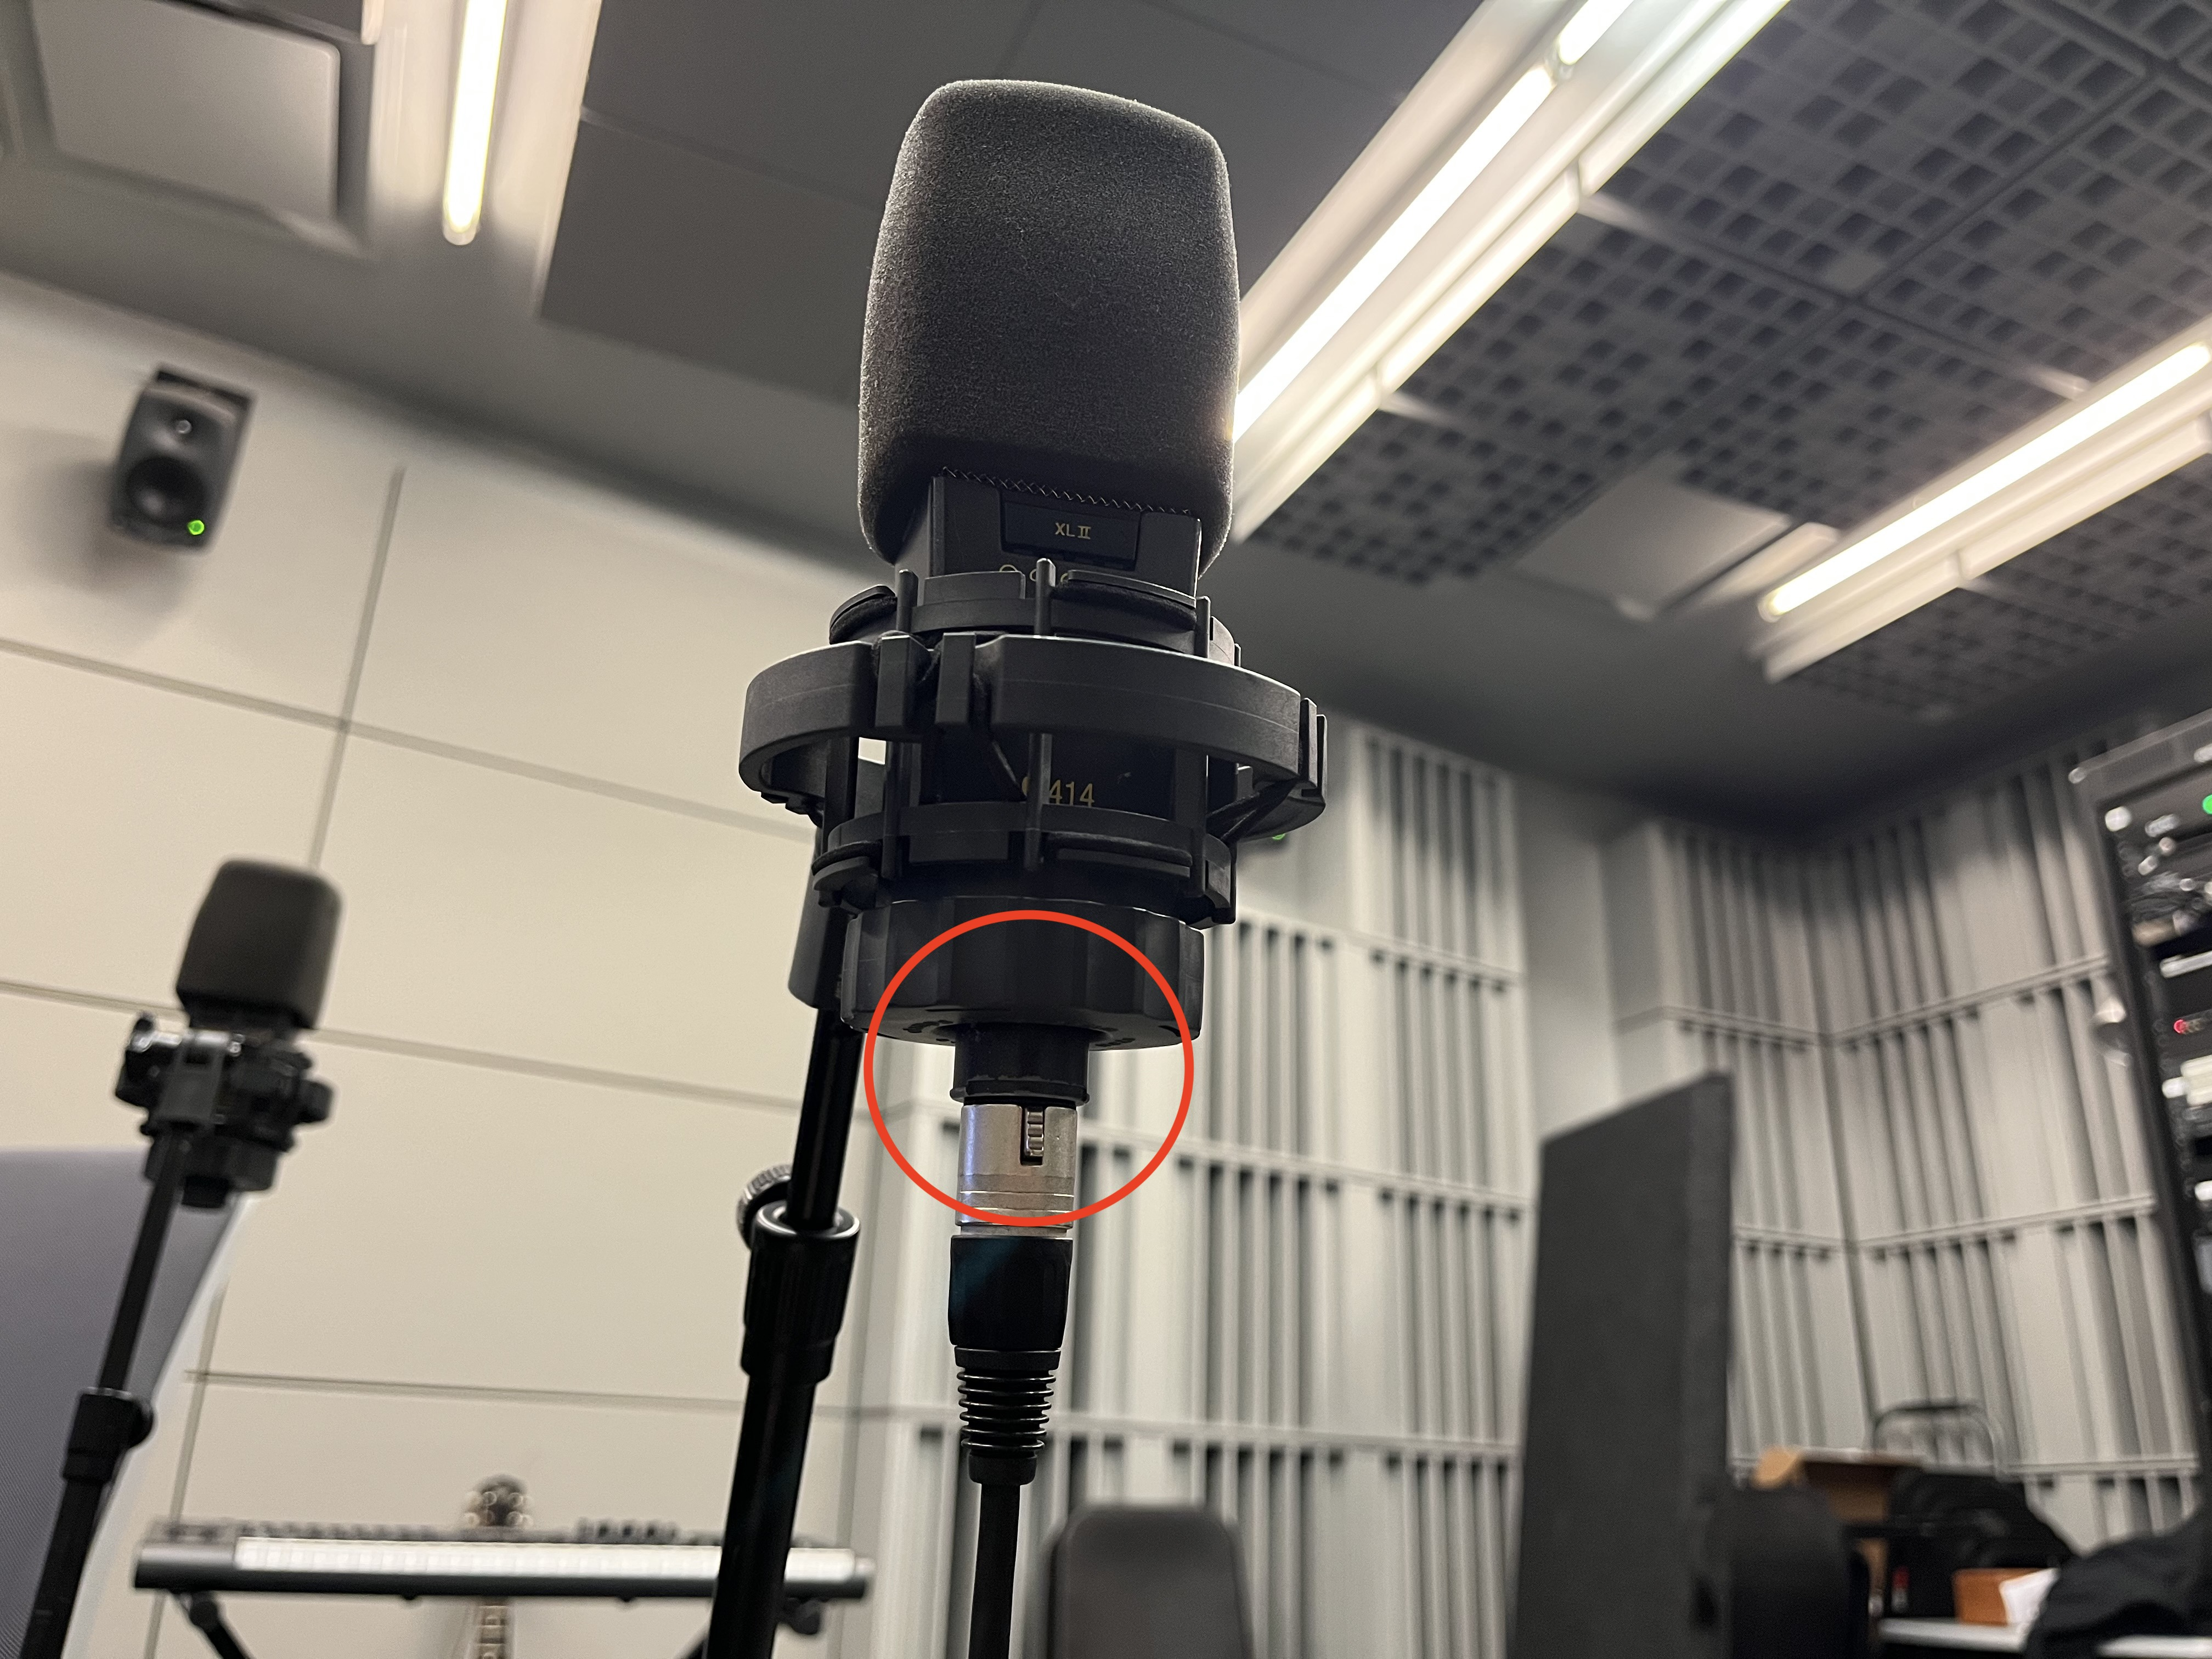
It should screw on firmly
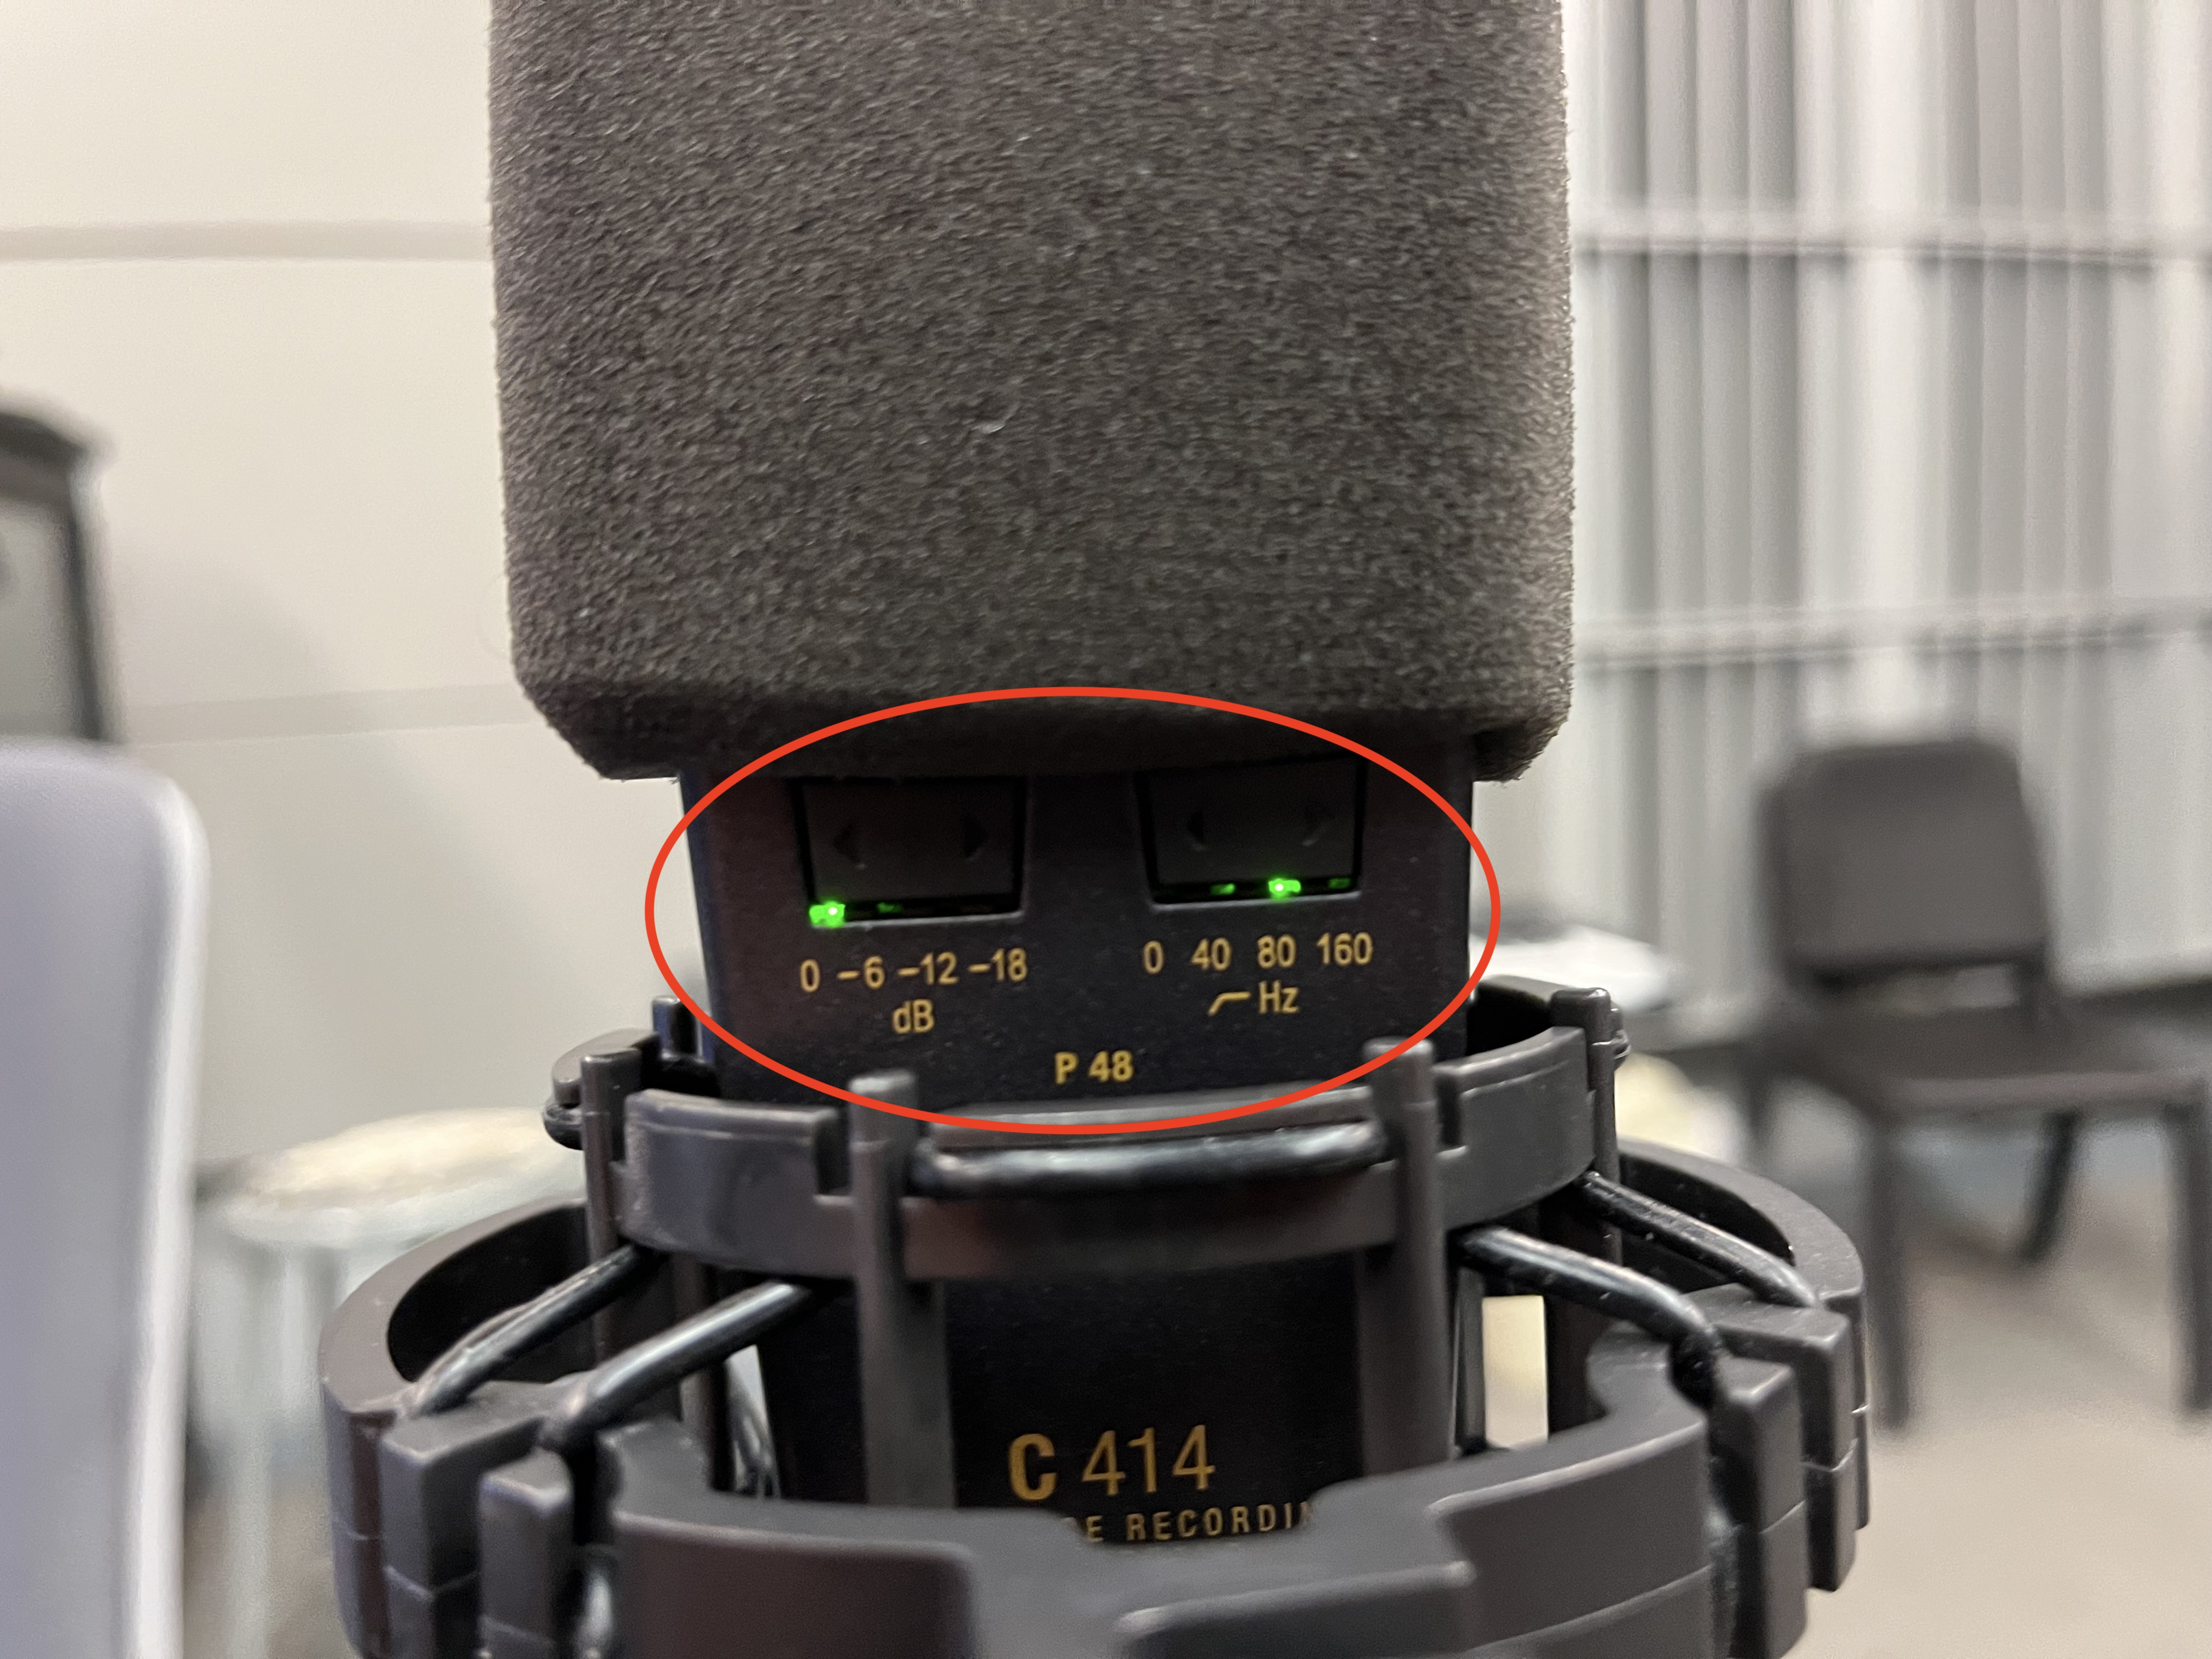
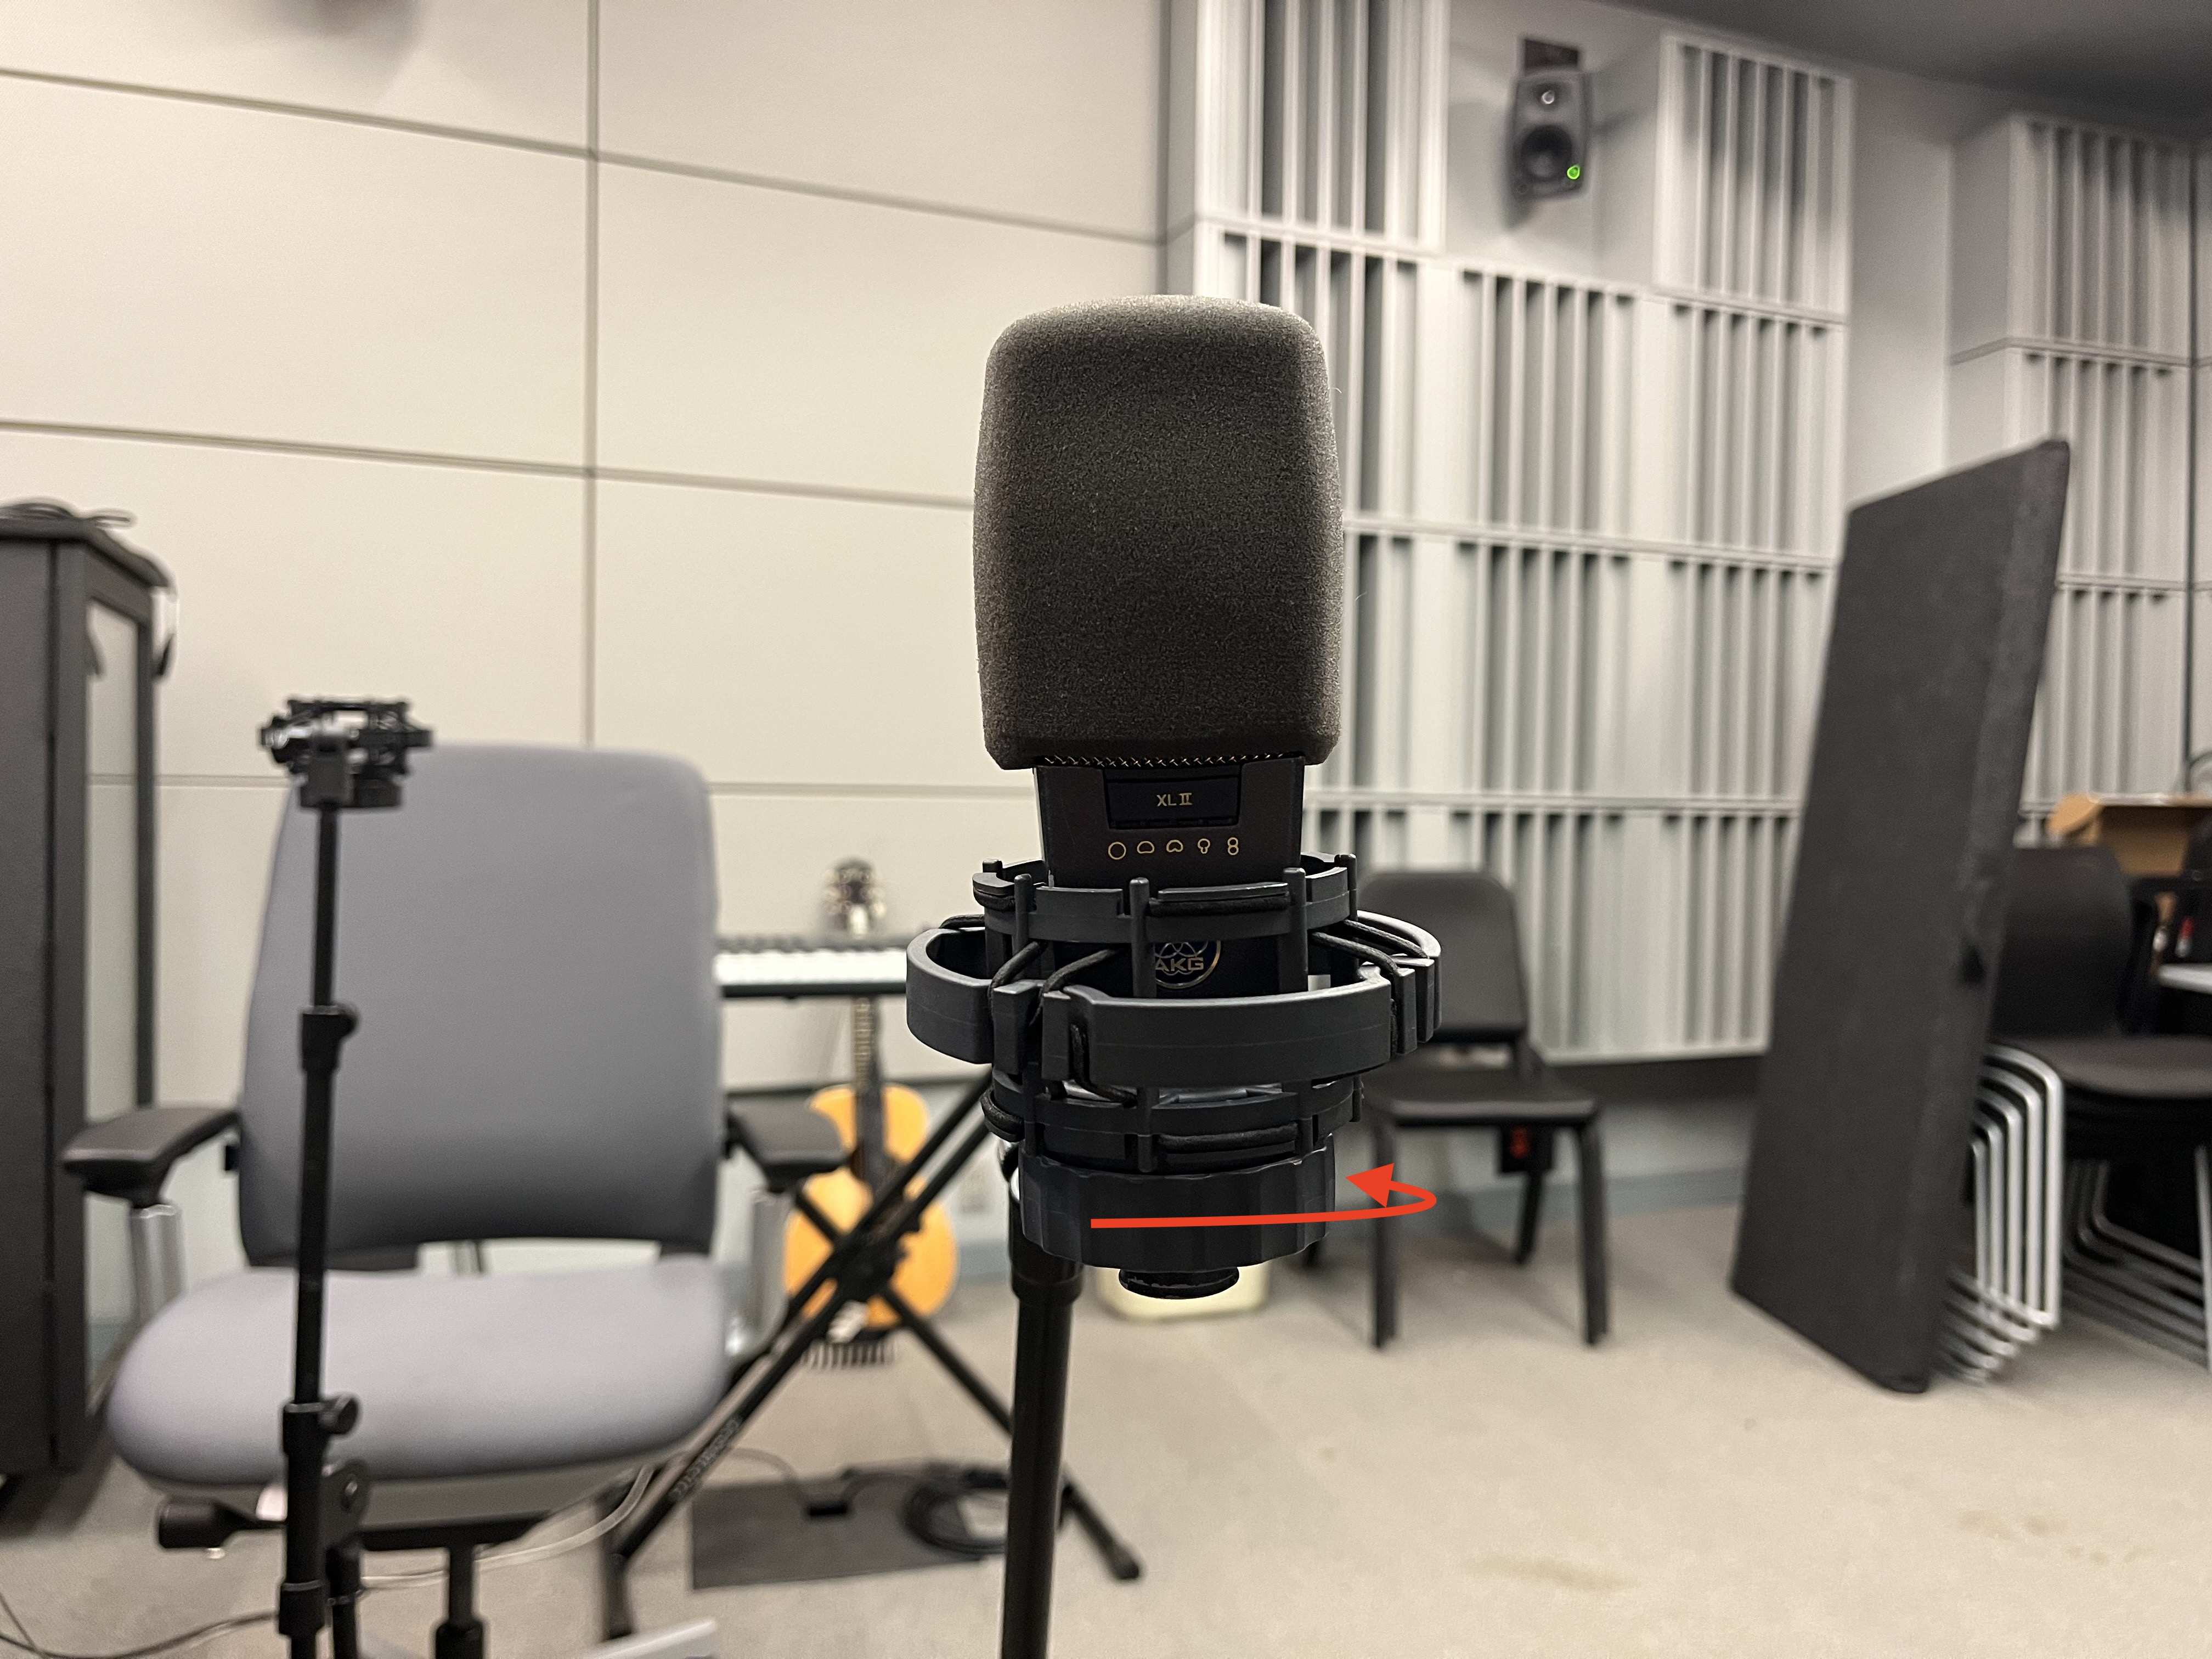
</mark></p></figcaption></figure>
7. a **Microphone** into the **Shock Mount** and fasten the base to tighten

   <figure><img src="https://1313564241-files.gitbook.io/~/files/v0/b/gitbook-x-prod.appspot.com/o/spaces%2Fs3fEUGujmVHeZsdShSEN%2Fuploads%2FMFbGcmc1nExGxVwf5CT4%2Fimage.png?alt=media&#x26;token=5ff43946-5635-4949-8f35-04dfbe58a0b6" alt=""><figcaption><p><mark style="color:green;">Make sure the <strong>front side is</strong> facing you (as shown above)</mark></p></figcaption></figure>

   <figure><img src="https://1313564241-files.gitbook.io/~/files/v0/b/gitbook-x-prod.appspot.com/o/spaces%2Fs3fEUGujmVHeZsdShSEN%2Fuploads%2F3VXnosWSWc0A78WZV1Lf%2Fimage.png?alt=media&#x26;token=16ae6801-d735-4bba-a58a-32f6da254d92" alt=""><figcaption></figcaption></figure>
8. Repeat steps **6** & **7** for the other **Mic Stand**
9. Take two **XLR Cables** from the bottom drawer of the left side cabinet

   <figure><img src="https://1313564241-files.gitbook.io/~/files/v0/b/gitbook-x-prod.appspot.com/o/spaces%2Fs3fEUGujmVHeZsdShSEN%2Fuploads%2FbC4mLzv1DAtdd5ymAsK3%2Fimage.png?alt=media&#x26;token=5e0770fa-1f03-4dda-b6c3-4972c030f12e" alt=""><figcaption></figcaption></figure>
10. Plug the concave ends of the **XLR cables** into both **Microphones**

    <figure><img src="https://1313564241-files.gitbook.io/~/files/v0/b/gitbook-x-prod.appspot.com/o/spaces%2Fs3fEUGujmVHeZsdShSEN%2Fuploads%2FJtsmvLwJ15sf6OLdjLVS%2Fimage.png?alt=media&#x26;token=414b0097-3f2c-4ff3-868a-5ad457331f94" alt=""><figcaption></figcaption></figure>

    <figure><img src="https://1313564241-files.gitbook.io/~/files/v0/b/gitbook-x-prod.appspot.com/o/spaces%2Fs3fEUGujmVHeZsdShSEN%2Fuploads%2FgwgD8Chf2OXngihuuPHN%2Fimage.png?alt=media&#x26;token=af46076f-cac5-4bcd-8e79-10e3b08438ee" alt=""><figcaption></figcaption></figure>
11. Plug the convex ends of both **XLR cables** into inputs 77 and 78 in the floor receiver.

    <figure><img src="https://1313564241-files.gitbook.io/~/files/v0/b/gitbook-x-prod.appspot.com/o/spaces%2Fs3fEUGujmVHeZsdShSEN%2Fuploads%2FuPxGZE6reCLYdBu8sn9S%2Fimage.png?alt=media&#x26;token=dd8072f4-0149-4794-bdb9-7f4e6e80a1d4" alt=""><figcaption></figcaption></figure>

    <figure><img src="https://1313564241-files.gitbook.io/~/files/v0/b/gitbook-x-prod.appspot.com/o/spaces%2Fs3fEUGujmVHeZsdShSEN%2Fuploads%2FAjKfp6FU8ZSDfc4eVqJ4%2Fimage.png?alt=media&#x26;token=9942c0cd-5309-4488-a0ff-5a21ea3657f9" alt=""><figcaption></figcaption></figure>

    <figure><img src="https://1313564241-files.gitbook.io/~/files/v0/b/gitbook-x-prod.appspot.com/o/spaces%2Fs3fEUGujmVHeZsdShSEN%2Fuploads%2FpwzR07eQ75Ggho3MJtpM%2Fimage.png?alt=media&#x26;token=a485dc6c-5b0a-49fe-a15a-15fdf37b32a2" alt=""><figcaption><p><mark style="color:green;">
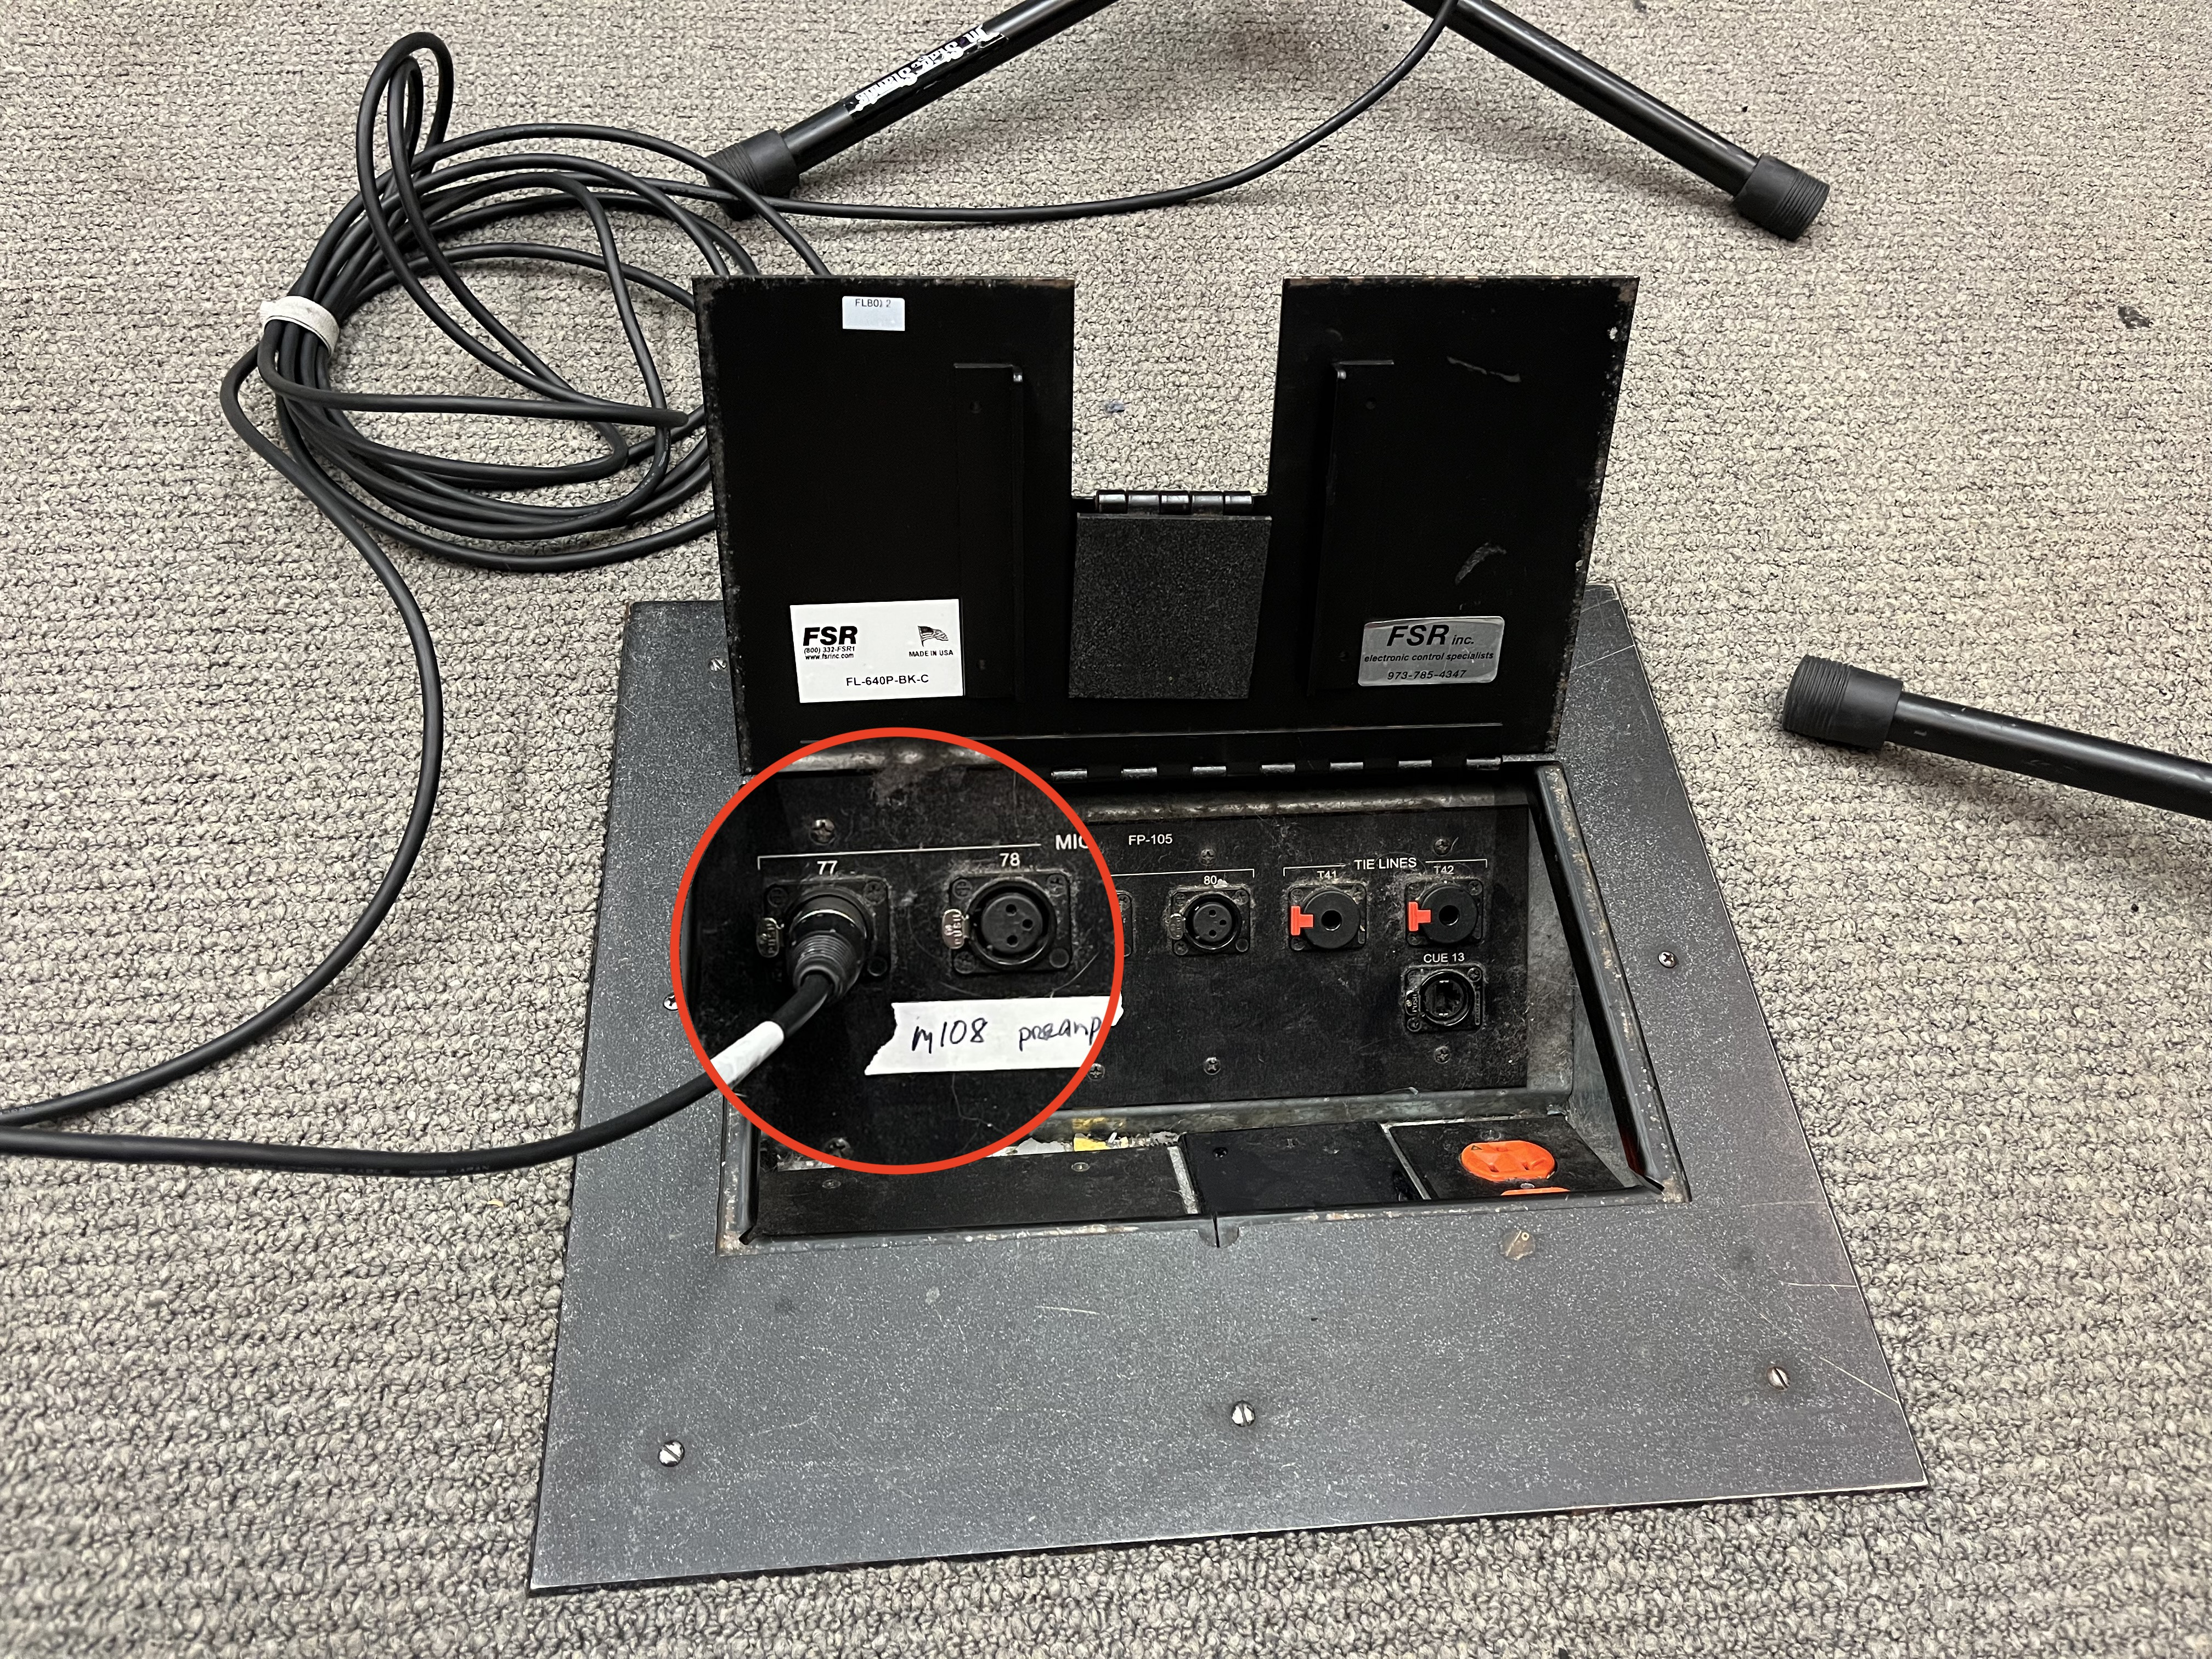
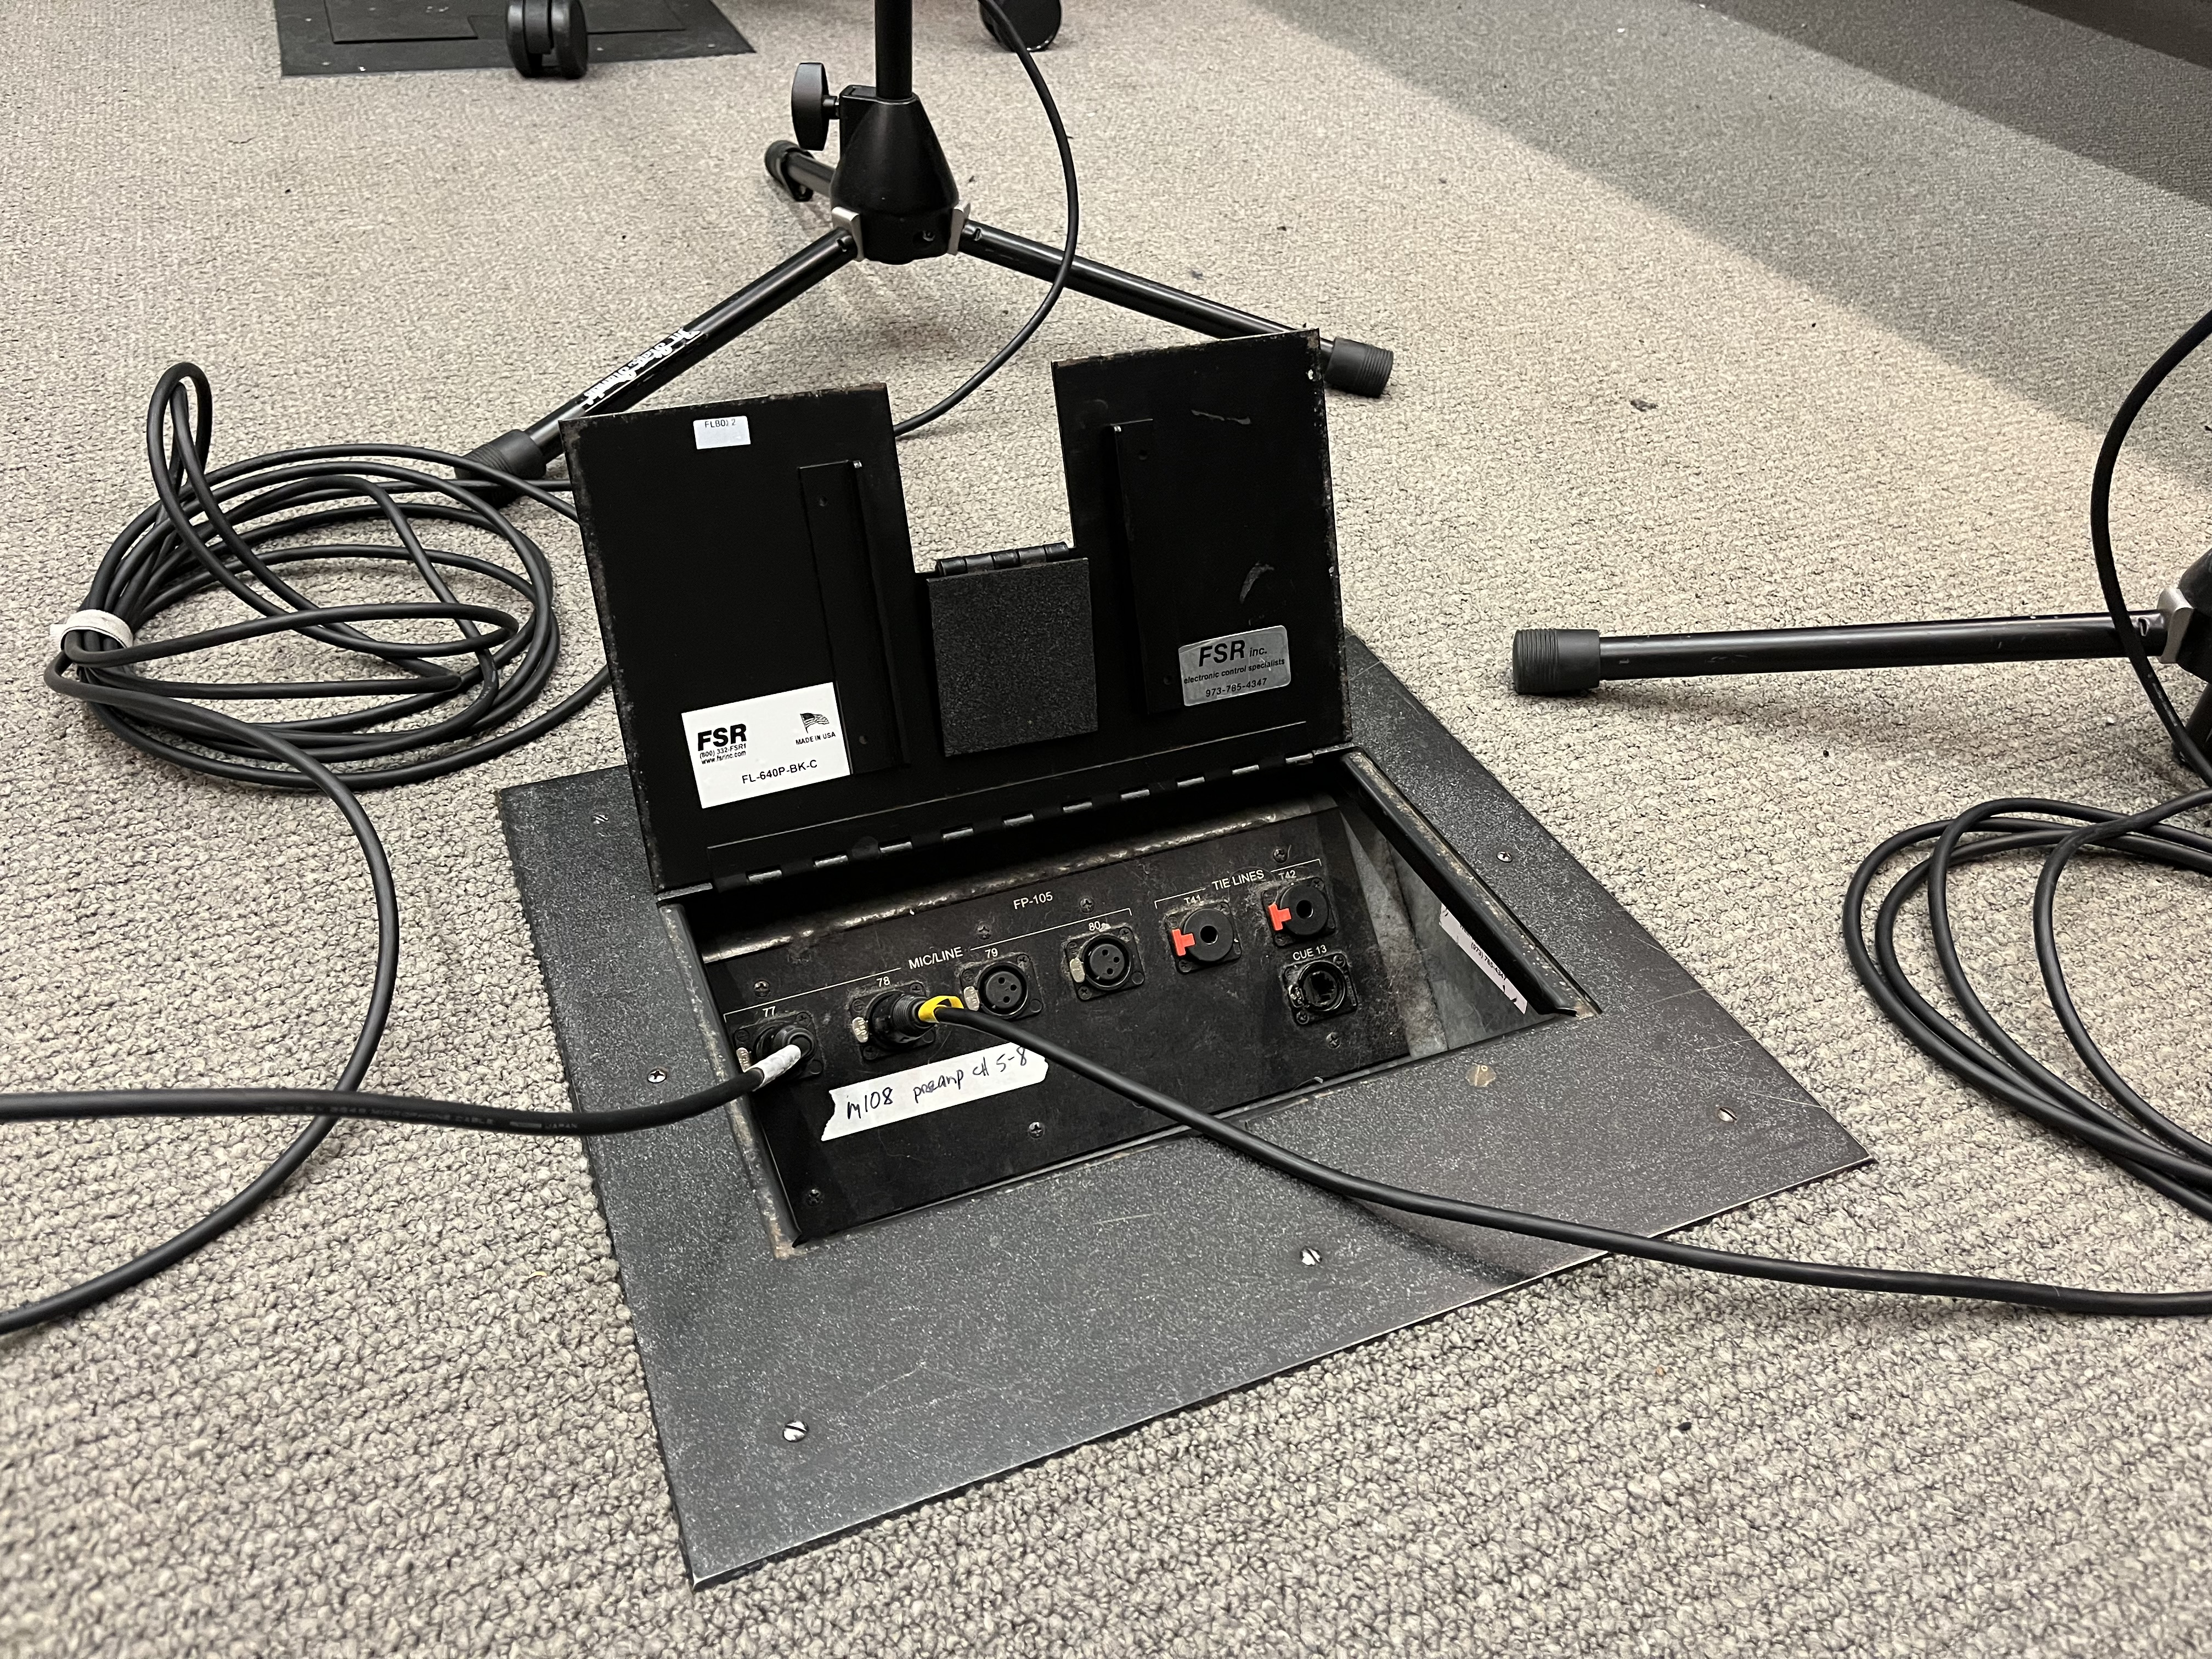
Make sure cables are tucked through opening when closing the floor port tray.</mark></p></figcaption></figure>
12. Because the **C414 AKGs** are *Condenser* Microphones, we need to make sure that they are receiving *Phantom Power*. This is done on the **m108 Preamplifier.**

    <figure><img src="https://1313564241-files.gitbook.io/~/files/v0/b/gitbook-x-prod.appspot.com/o/spaces%2Fs3fEUGujmVHeZsdShSEN%2Fuploads%2FkWJutTG0bHJExQpiVZGw%2Fimage.png?alt=media&#x26;token=8dce303f-d576-47bf-aa4c-b01d3466042e" alt=""><figcaption></figcaption></figure>

    Turn the **Edit** knob to scroll between inputs. Click on the **Edit** knob to **select/deselect** them. Click on the **48V** button to turn on and off *phantom power*. Inputs **5** & **6** require *phantom power* as indicated by the Lightning Bolt icons.

    <figure><img src="https://1313564241-files.gitbook.io/~/files/v0/b/gitbook-x-prod.appspot.com/o/spaces%2Fs3fEUGujmVHeZsdShSEN%2Fuploads%2FaVoqiHYsK0uZO3Le5q2T%2Fimage.png?alt=media&#x26;token=a688e9f7-97cd-4409-a895-50e74e18e876" alt=""><figcaption></figcaption></figure>
13. To ensure optimal sound quality, make sure the *polar patterns* on both microphones are set to *cardioid* (the middle option on the front of the mics).

    <figure><img src="https://1313564241-files.gitbook.io/~/files/v0/b/gitbook-x-prod.appspot.com/o/spaces%2Fs3fEUGujmVHeZsdShSEN%2Fuploads%2F900GHbgnb9l6rrh0lCHr%2Fimage.png?alt=media&#x26;token=554e325f-3ae1-479f-a252-6d57f02bd144" alt=""><figcaption></figcaption></figure>
14. On the backs of the microphones, set the *dB* to 0 and the *Hz High Pass* to 80.

    <figure><img src="https://1313564241-files.gitbook.io/~/files/v0/b/gitbook-x-prod.appspot.com/o/spaces%2Fs3fEUGujmVHeZsdShSEN%2Fuploads%2FHyiJAVsQutfEabkfs9BK%2Fimage.png?alt=media&#x26;token=1e2920db-ef5e-4d6d-b0ea-2e8b560bf596" alt=""><figcaption></figcaption></figure>
