# Video Setup for Recording Humans
***Don't forget to charge your batteries and check your SD cards before your shoot!***
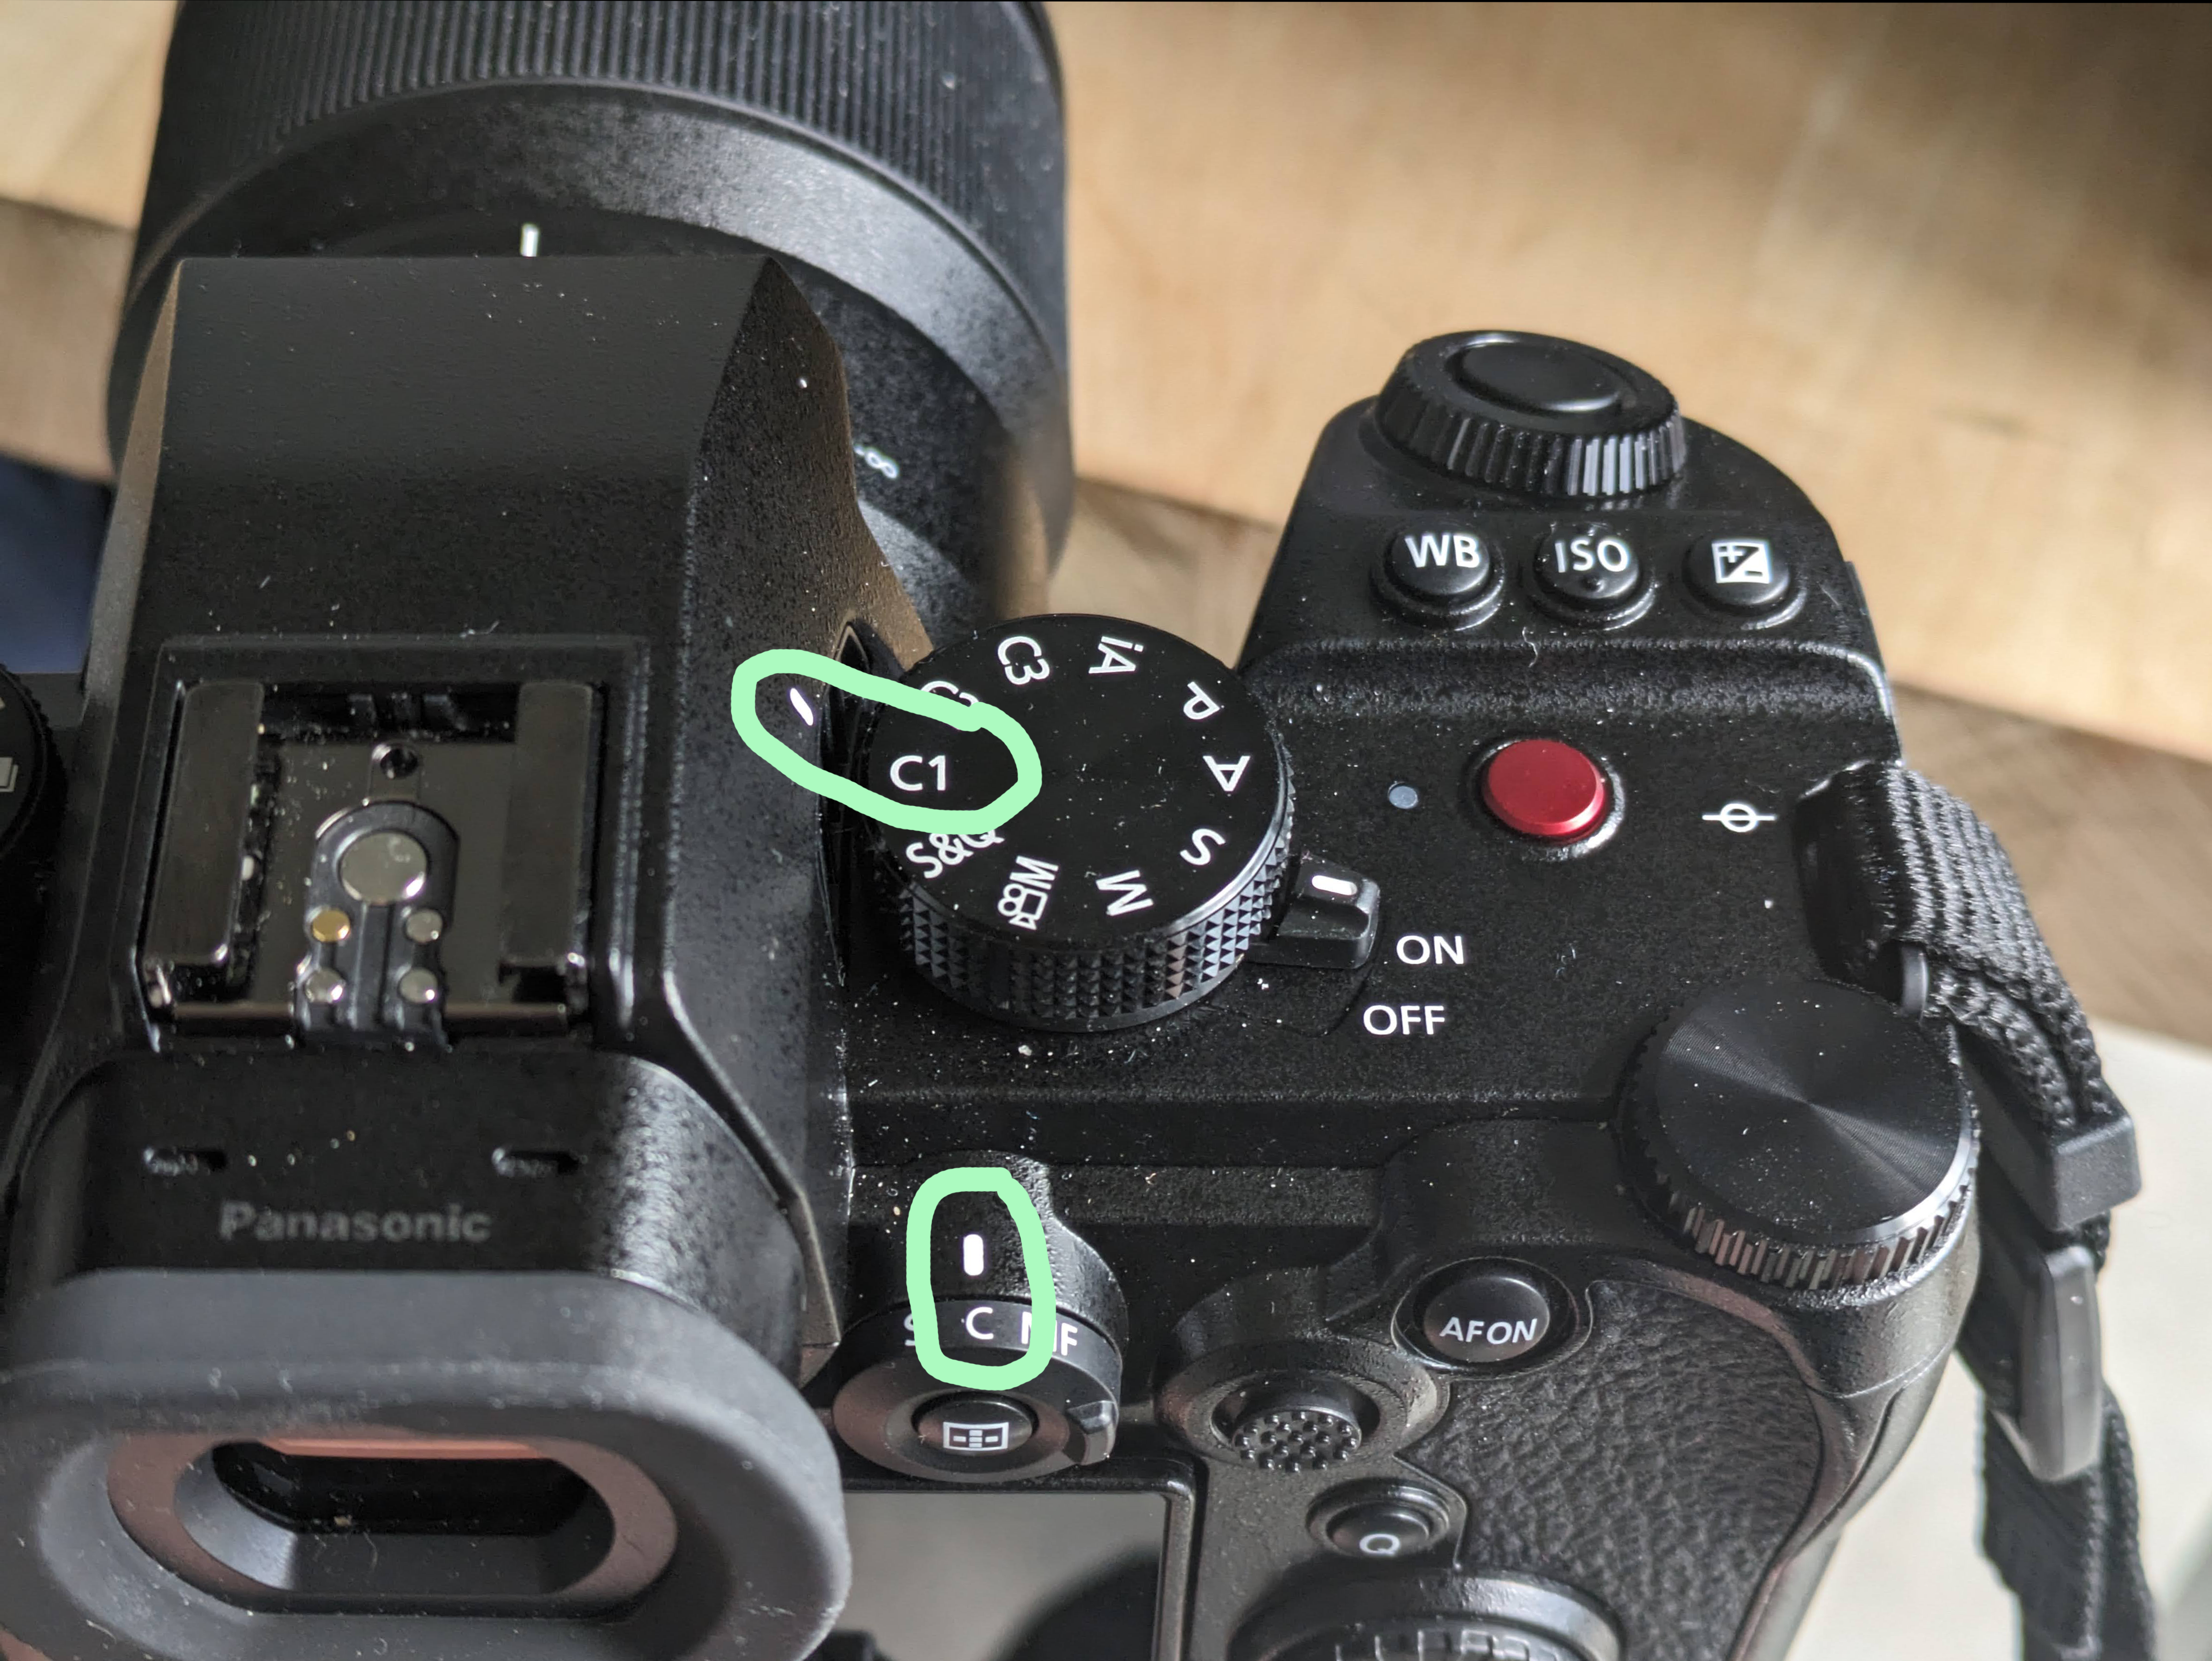
## Setting Physical Dials
* Set Mode Dial to C1 (custom mode 1)
*This mode has already been preset with the optimal settings for the type of video recording done for interviews, human subjects, etc (talking head, interview, etc) at 30fps, 60 shutter speed.*
**OR**
If you are filming actors i.e. trying to get a cinematic look
you will set Dial to C2 (Custom mode 2)
Mode C2 will be preset at 24 frames per second and therefore will have the Shutter speed at 2X that number at 50 preset.
* Set Focus Mode Dial to C (continuous) This will be the preferable setting to shooting anything with varying focus, a piece with movement etc. You may prefer the (S) "Still" setting for a scene with a single focus. In the C2 setting you will still be able to manually focus if you so choose, even without toggling to the (MF) setting.
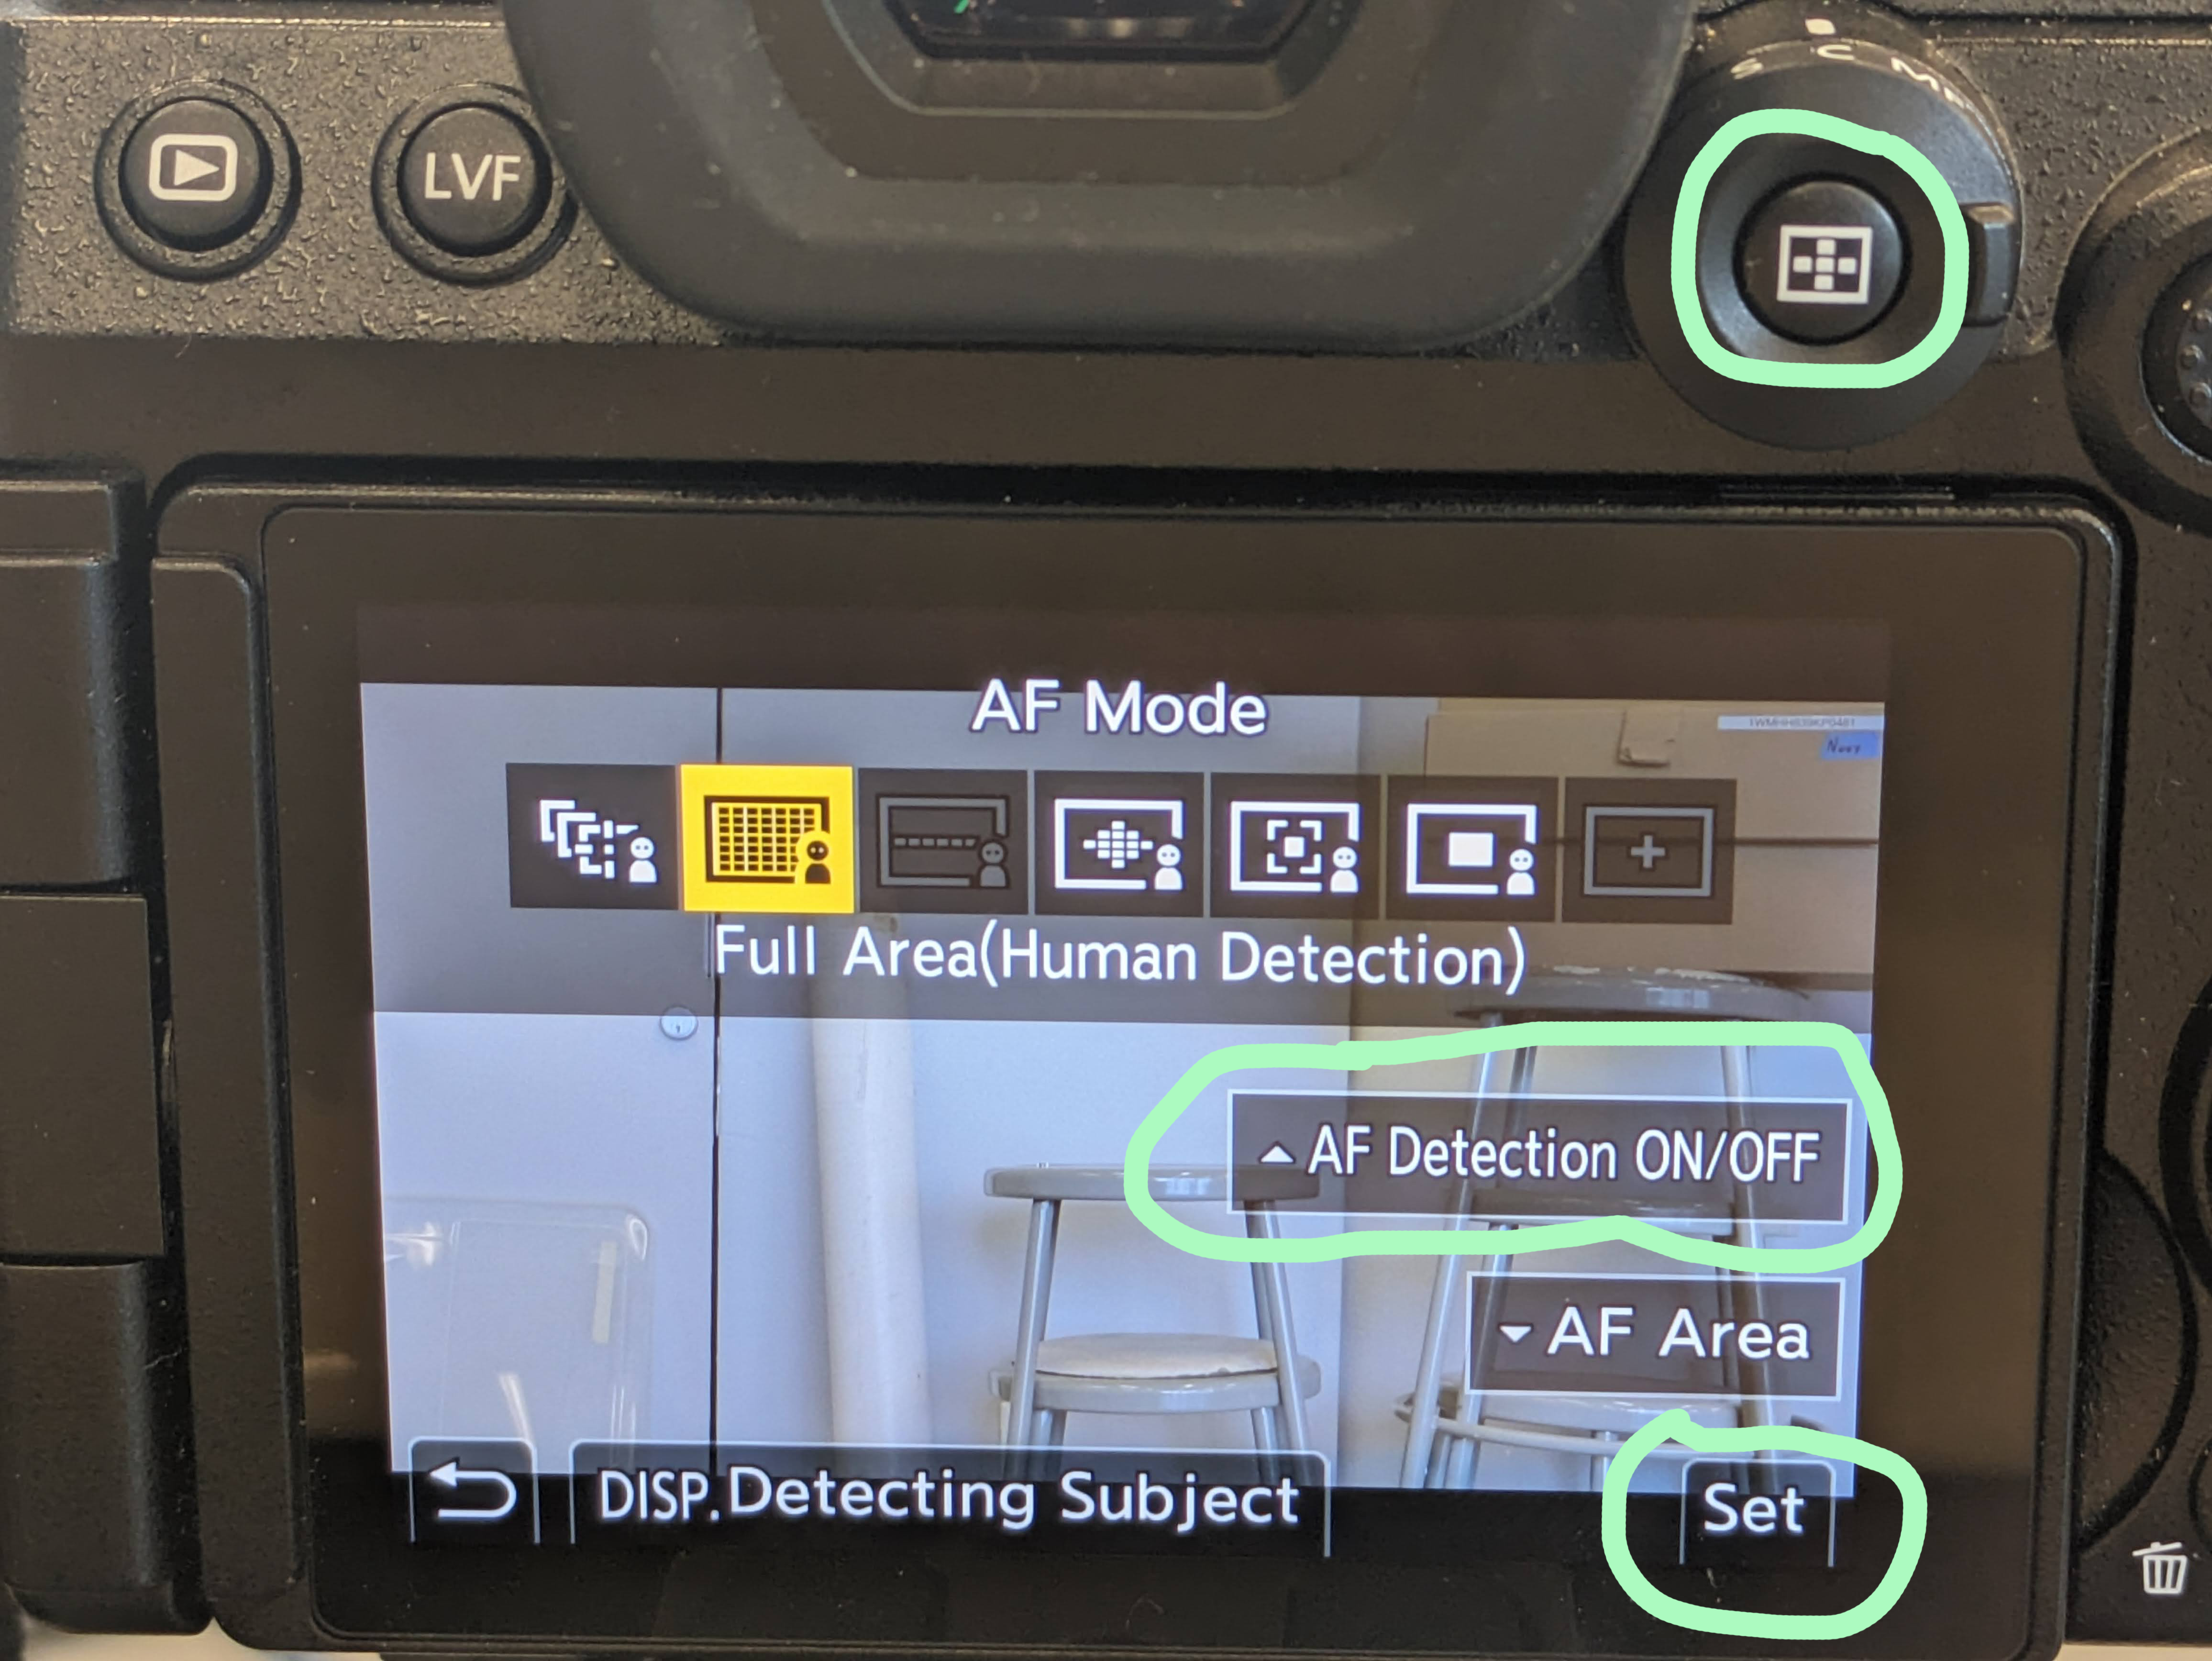
## Set Autofocus (AF) Type
1. Press the autofocus button on the back panel of the camera, inside the focus mode dial.
2. Select Full Area ( Human Detection )
1. ***If*** you don't see "Human" as an option for any AF type, then toggle it on by pressing the "AF Detection On/Off" button on the LCD screen
3. Press the set button on the LCD Screen
*We have found this to be the best AF Type vlogging, monologues, any video setup where a relatively stationary camera is recording in front of on one or two people.*
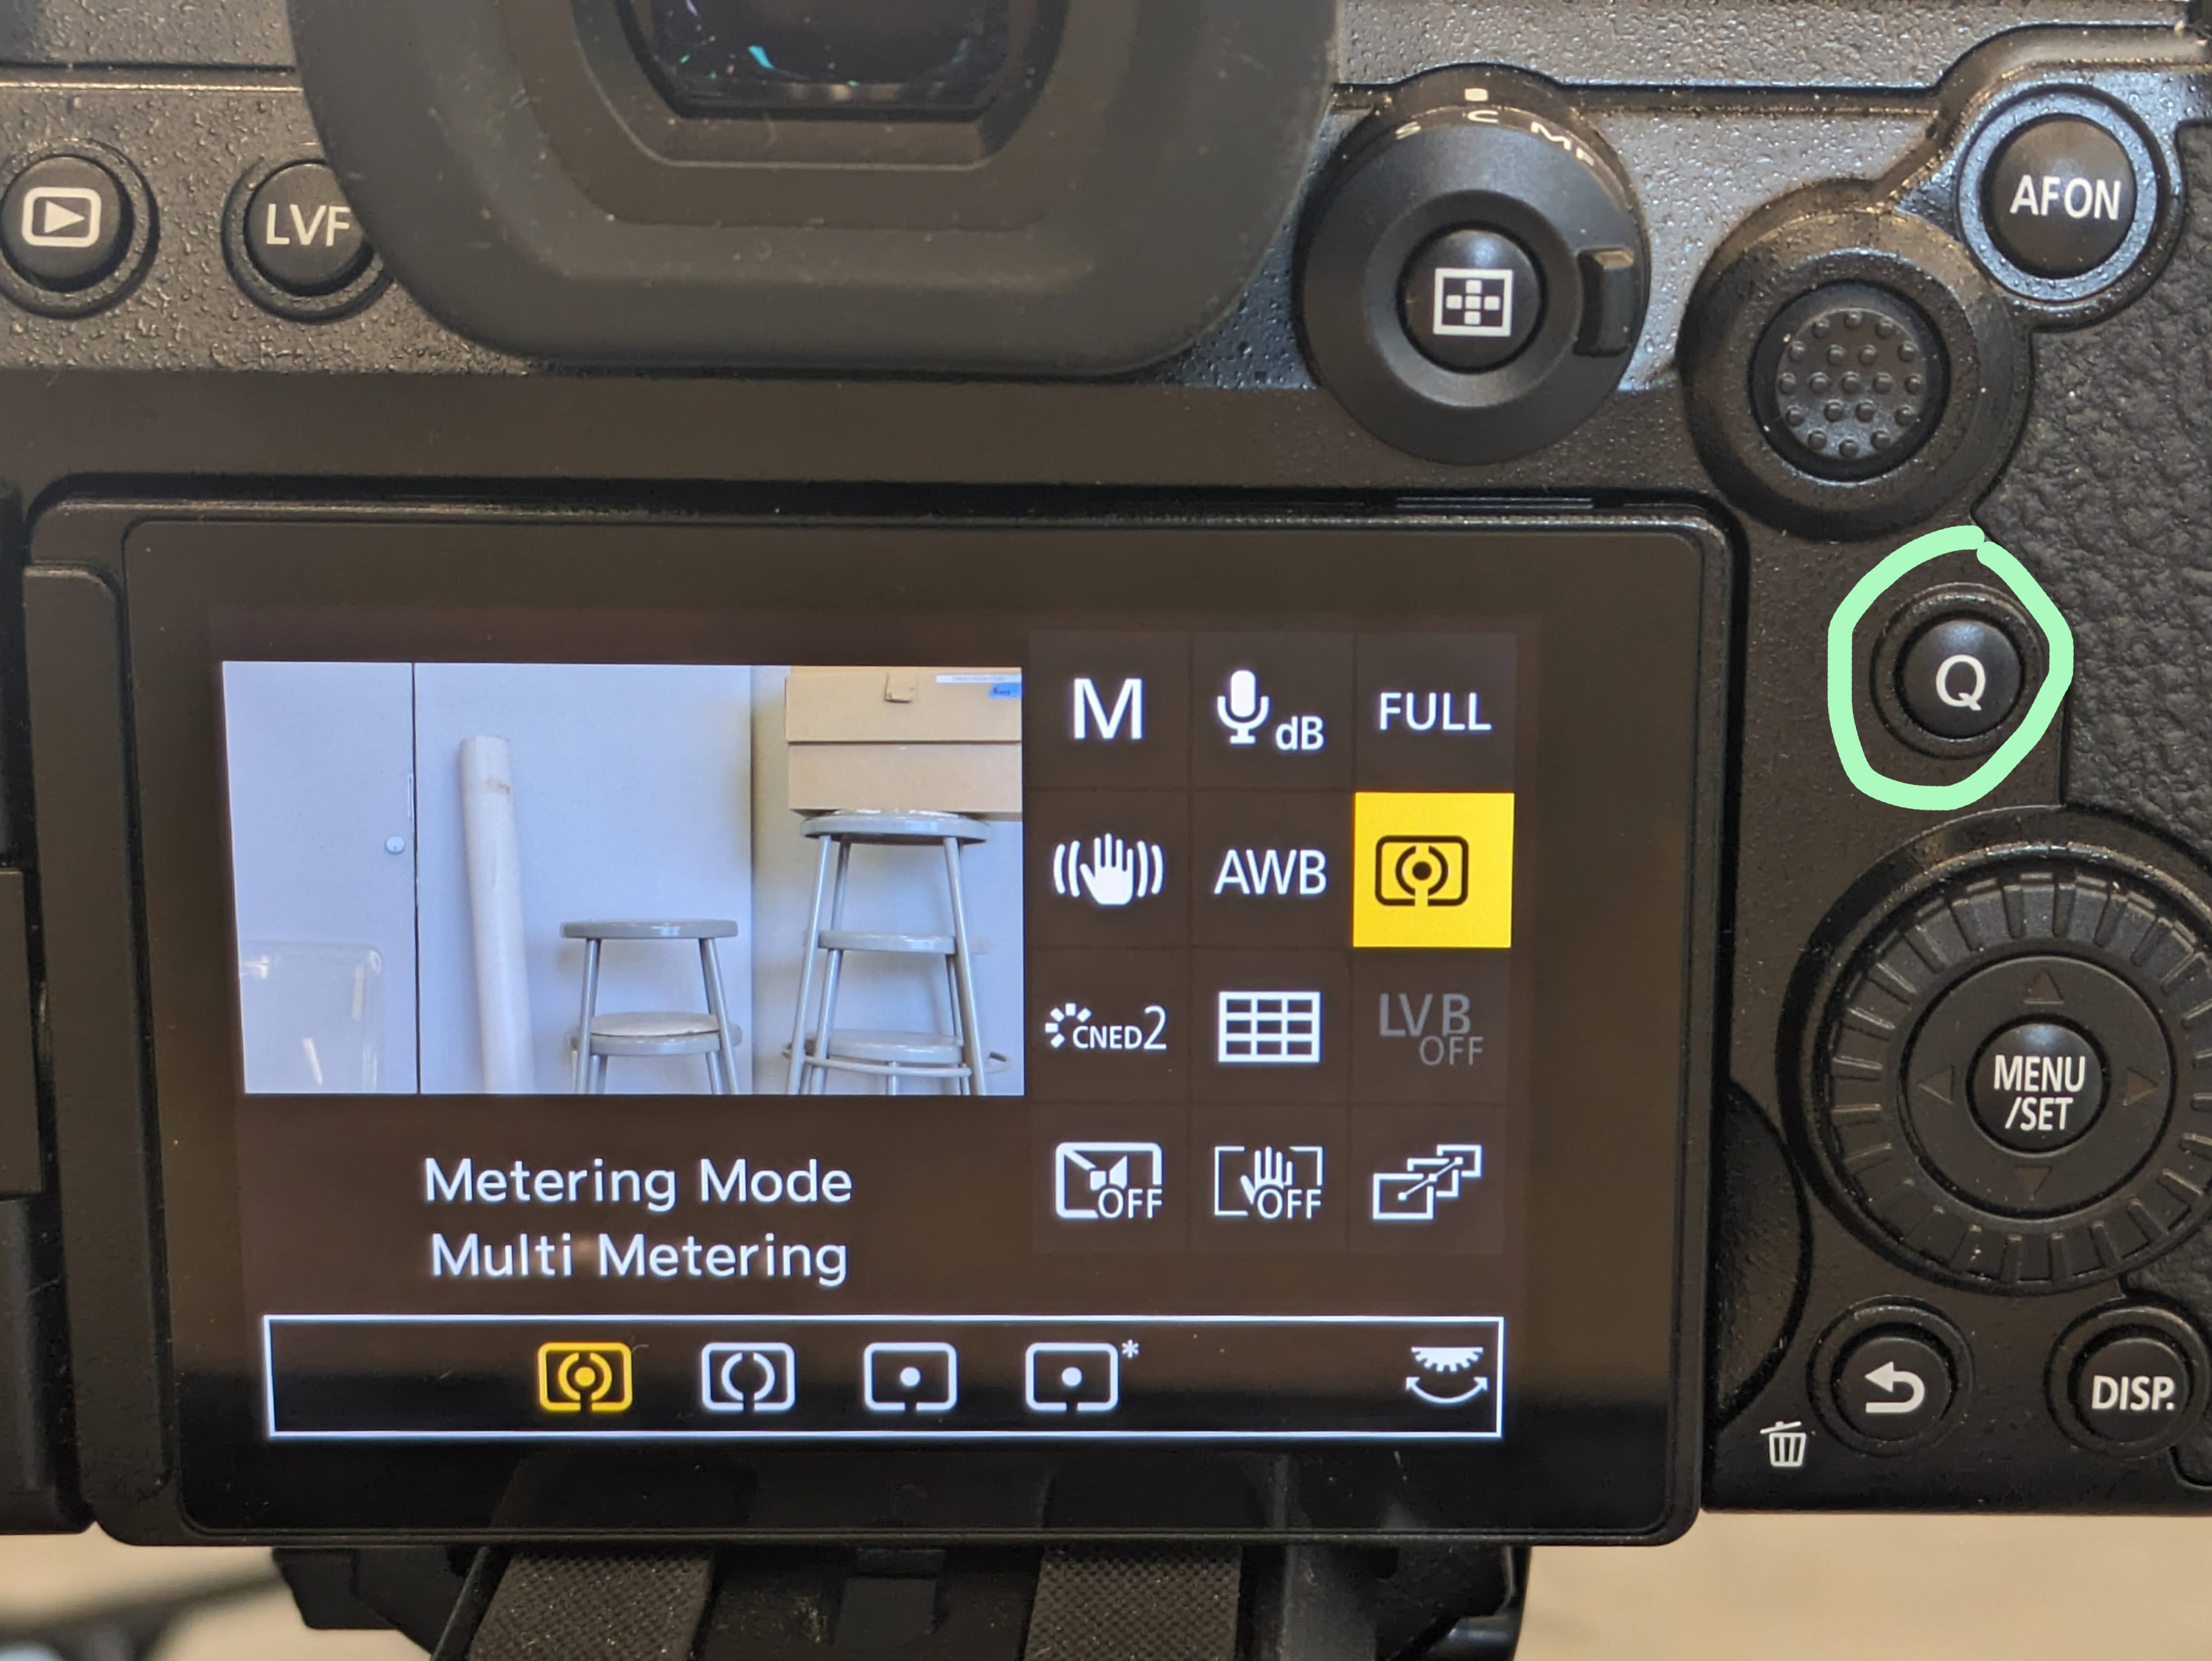
## Set Metering Type (evaluating exposure)
1. Enter the quick menu by pressing the small button labeled "Q" on the back panel of the camera.
2. Select the icon for metering (highlighted in yellow in the picture below)
3. Select the icon on the left for multi-metering (also in yellow)
***Metering Modes** determine how the camera determines the correct exposure for the scene. **Multi Metering Mode** takes into account the entire scene, but places an emphasis on the center of the frame, which is likely where your subject will be.*
## Shutter and Aperture Settings
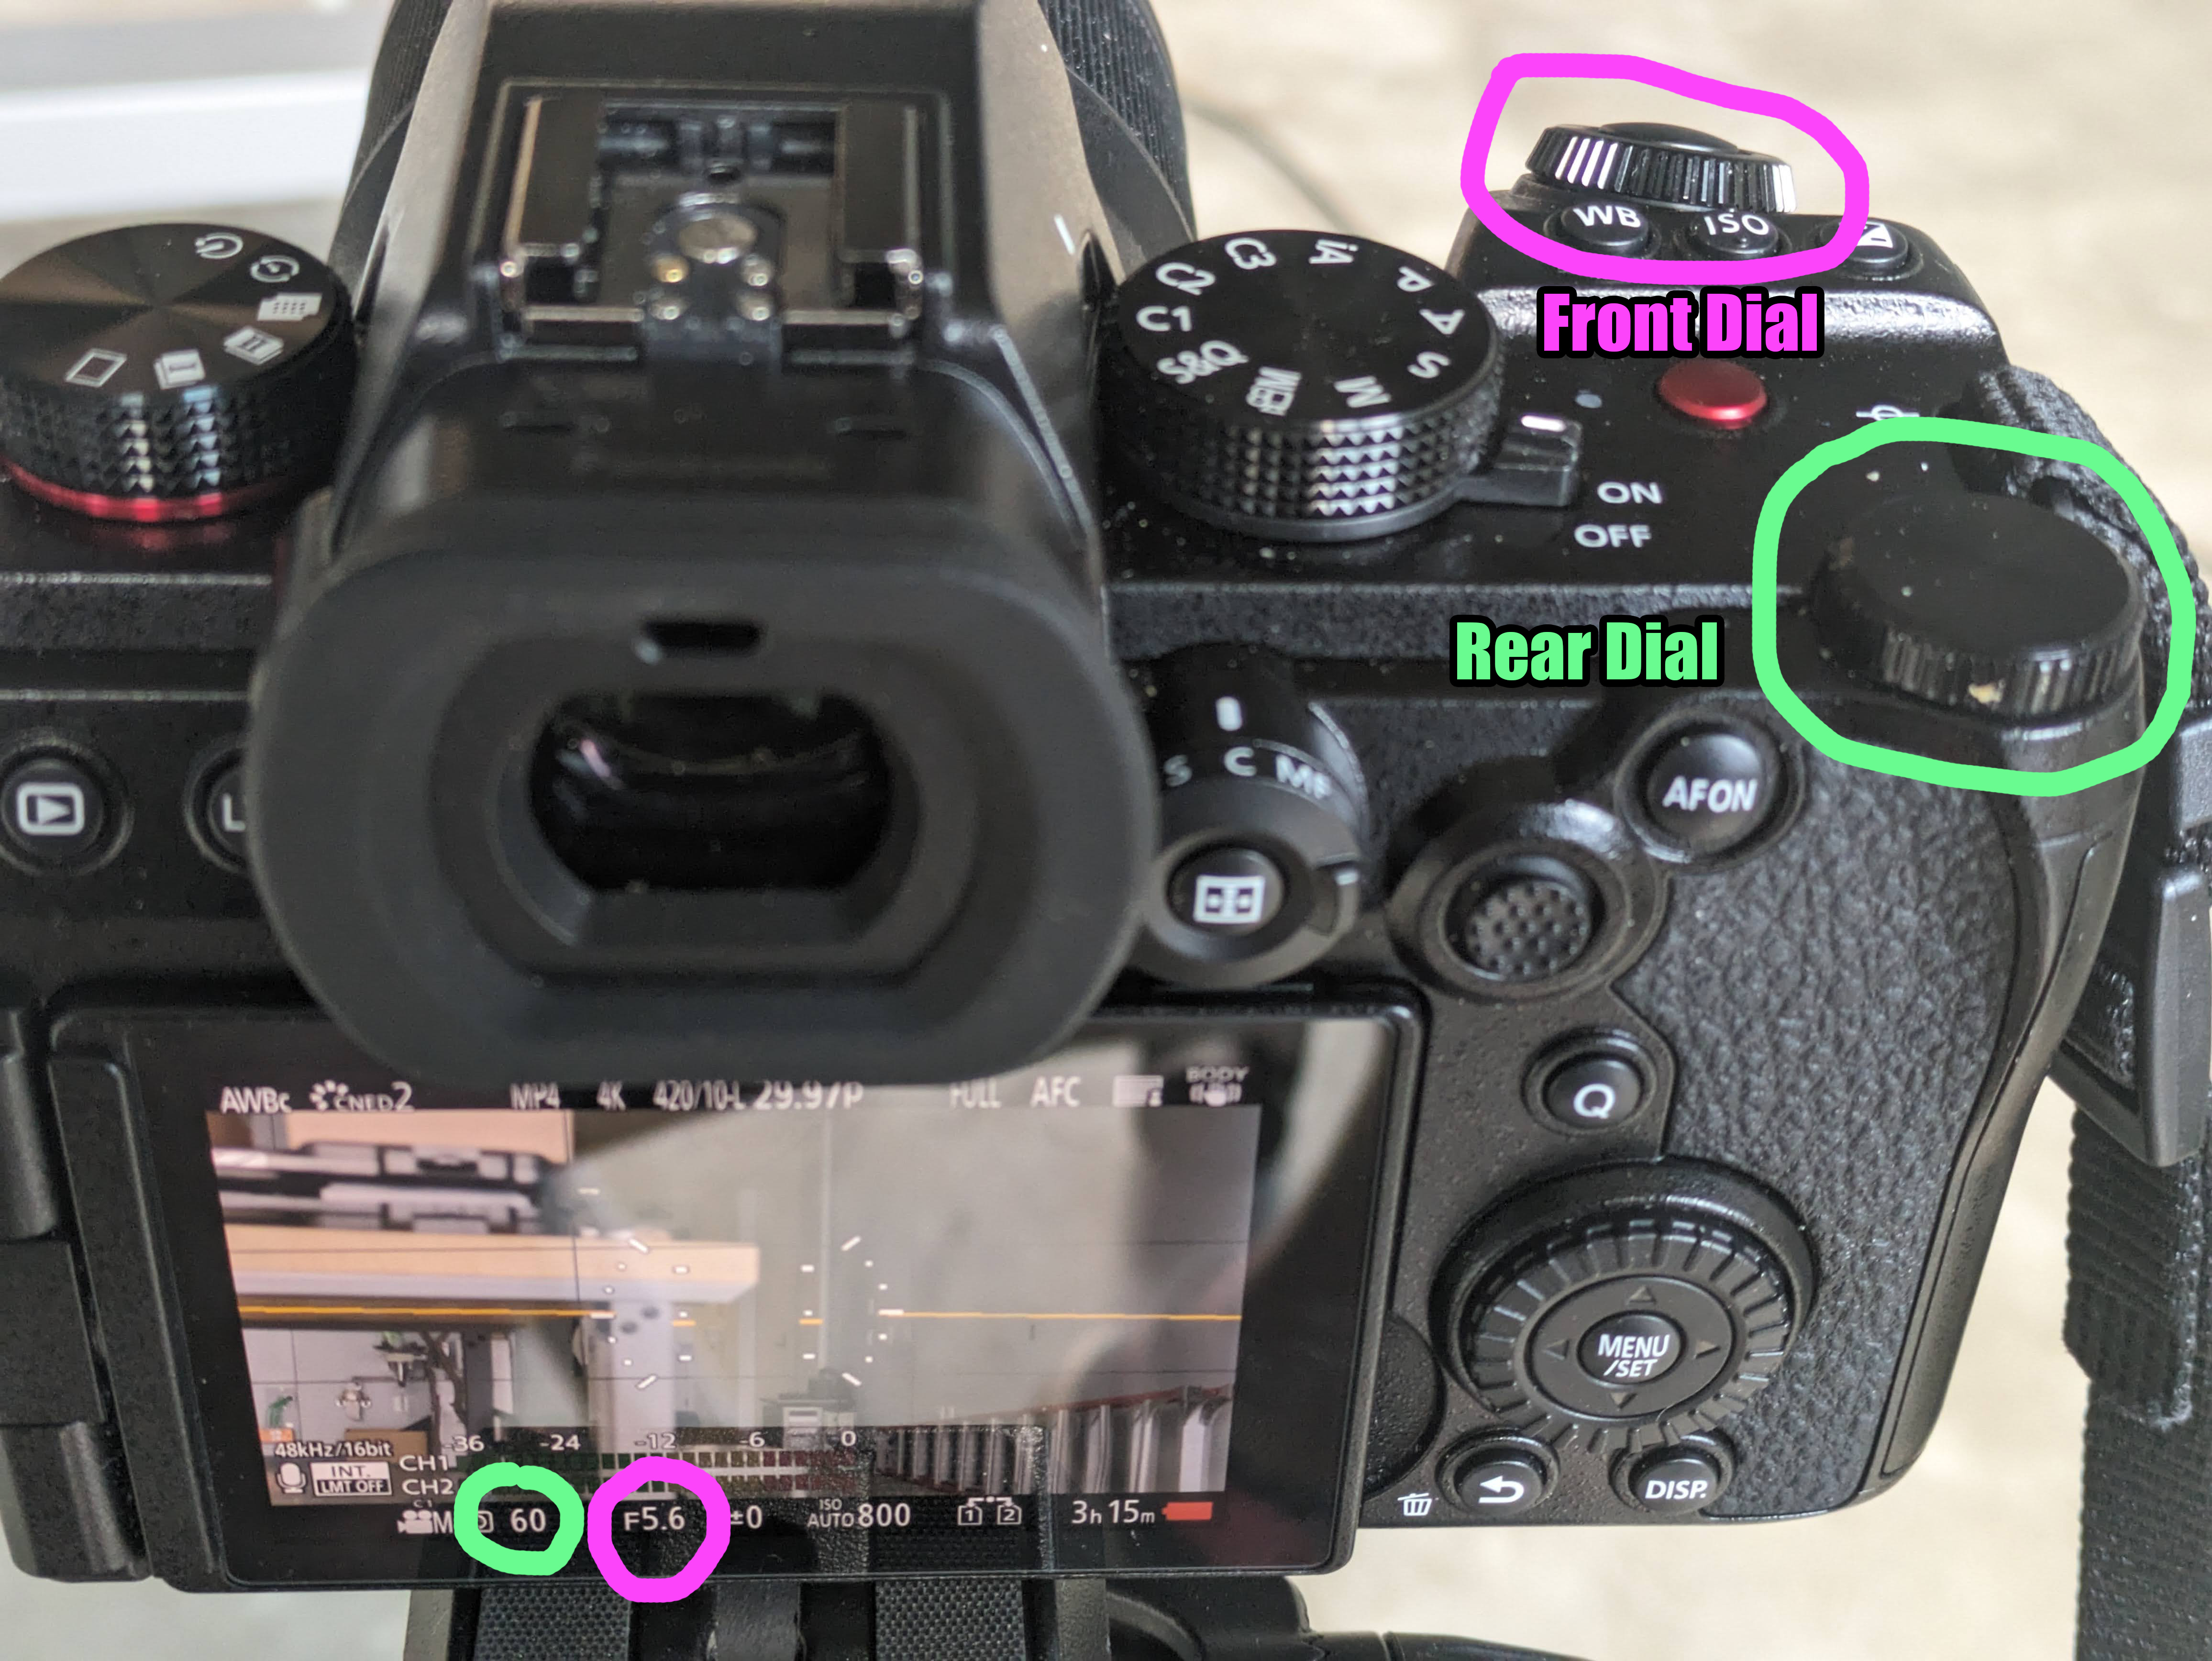
### Shutter Setting: Why and How
Your Custom Mode 1 settings has the camera recording at 4K, 72Mbps, 10 bit color, and **30fps**. For this reason at this mode ***your shutter should always be set to 1/60th of second.*** This is because your shutter speed denominator is always set to twice the value of your fps or frames per second. So a 24 fps (cinematic) would require a shutter speed of 1/50th. A 60 fps (hyper-real) require a shutter speed of 1/120th, and so on
**To set your shutter speed to 1/60th** turn the **rear dial** until you see the number 60 in the lower right of your LCD display
Front dial (purple) sets Aperture and Rear dial (green) sets Shutter.
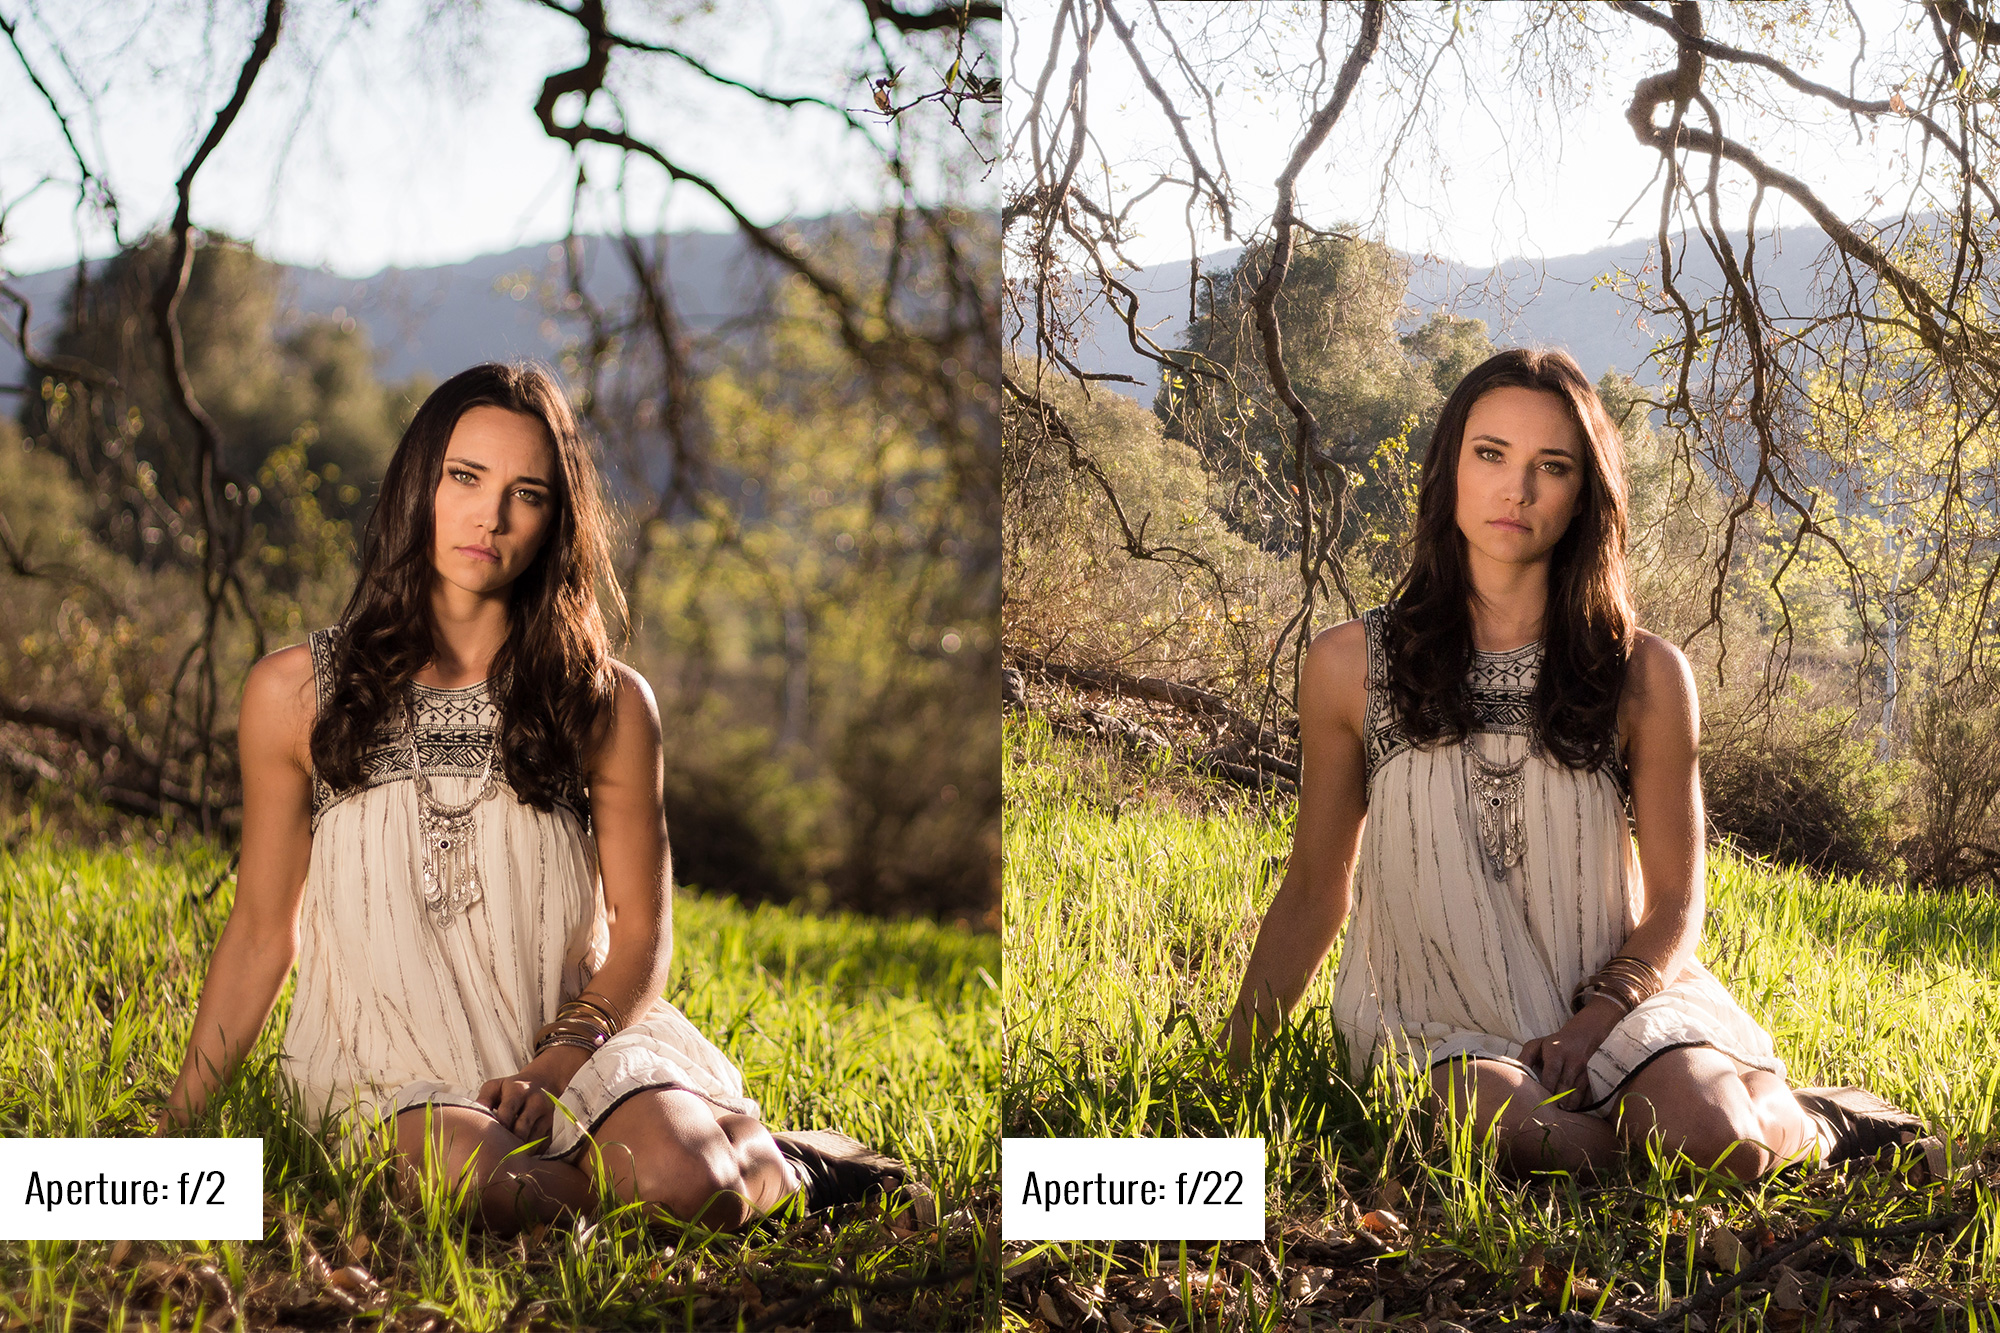
### **Aperture Setting**
The aperture setting (denoted by f/ number) determines the depth of field of your shot, with lower numbers indicating a shallow depth of field (blurry background, sharp subject) and higher numbers a deep depth of field (both foreground and background relatively in focus with subject staying sharp).
**We recommend setting your aperture between f/4.0 and f/8.0** so that there is a better chance of your entire subject being in focus even if they move a bit.
**Set your aperture by turning the front dial** (or shutter dial) until you fall somewhere in that range. Your aperture setting is displayed on the bottom of the LCD panel to the right of your shutter setting
Tip: if you are in a darker setting, use a smaller aperture number. the smaller the number, the more light is let into the camera
***
**For More Advanced Use**
Should you not be satisfied with the settings in C1 or C2 and desire to change to something manually, you will want to set the large dial to the (CameraM) icon. From there you can go through in the menu and change the Photo Style, including using the V-Log setting for low color saturation that is easier to "color correct" in post.
Photo Style
The C1 is set to 4K but for those looking to attempt it, the camera does shoot in 6K, as well as shooting in higher frame rates for projects that would be edited into slow-motion, for example.
The C2 is set to Full HD, a lower setting to allow for smaller file sizes and greater flexibility in editing. Keep that in mind should you want to set it at 4K or greater. You may want to manually configure (M setting) so that you don't reset to FullHD when you shut off in the C2 setting. Custom mode is meant to retain its fixed settings after you turn off and turn back on the Lumix.
**Image Stabilization**
Image stabilization is a technology that allows the shakiness of doing a tracking shot (such as following someone walking) to be minimized or even eliminated in some cases.
The C1 & C2 settings have been set to the "Normal (Picture of shaking hand)" setting as you can see in the top "Operation Mode" setting.
If you scroll down to **E-Stablization (Video):** this is a technology where the image is very slightly cropped to account for any movement and digitally adjusted. This is useful for tracking i.e. walking, physical action shots.
**Boost I.S (Video)** is a more extreme version of E-Stabilization that can be less recommended for tracking shots because of it blurring the edges of the video. However if you're looking to mimic a tripod shot, without a tripod, you can use this setting to great effect.
The video below does a good job of going over these features as well as showing footage of them in practice.
{% embed url="" %}
{% content-ref url="initial-setup-for-recording-monologues/audio-set-up" %}
[audio-set-up](https://gitbook.brown.edu/bai-creative-technology/check-out-equipment/camera-kit/initial-setup-for-recording-monologues/audio-set-up)
{% endcontent-ref %}